Category Archives: Java

Exploring the Bitcoin blockchain using Java

[This is a short summary of material that I prepared for final year project students]

I assume that you already have a vague idea of what a bitcoin is and you have a simple understanding of the mechanisms behind transactions: payments are made to addresses (that are anonymous, in the sense that they cannot be directly linked to a specific individual), and all transactions are public. Transactions are collected in blocks, and blocks are chained together in the blockchain.

You can think of the blockchain as a big database that is continuously updated and is accessible to everyone. You can download the full blockchain using a software like Bitcoin Core. After installing the software, it will take a couple of weeks for your installation to synchronise. Notice that, at the time of writing, the blockchain has a size of over 130 Gb, take this into consideration…

If you have blockchain data available (not necessarily the whole blockchain, you can also work on subsets of it), it can be analysed using Java. You could do all the work from scratch and read raw data from the files etc. Let’s skip this step and use a library instead. There are several options available in most programming languages. I’m going to use Java and the bitcoinj library. This is a big library that can be used to build applications like wallets, on-line payments, etc. I am going to use just its parsing features for this post.

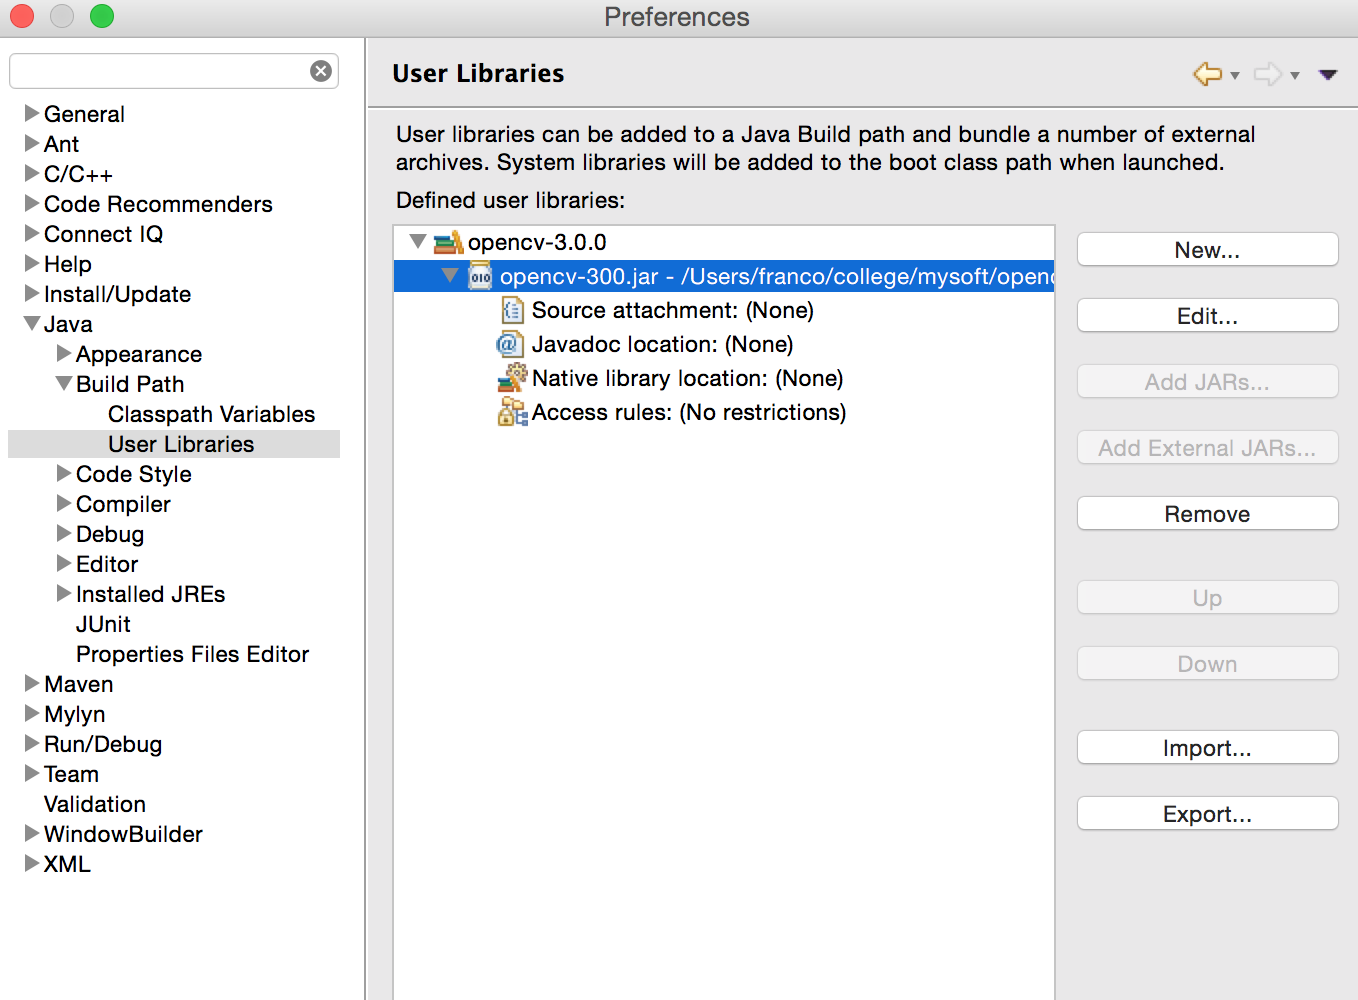
First of all download the jar file for the library at https://bitcoinj.github.io/ (I’m using https://search.maven.org/remotecontent?filepath=org/bitcoinj/bitcoinj-core/0.14.4/bitcoinj-core-0.14.4-bundled.jar). Then, download SLF4J (https://www.slf4j.org/download.html), extract it, and get the file called slf4j-simple-x.y.z.jar (in my case: slf4j-simple-1.7.25.jar). Add these two jar files to your classpath and you are ready to go.

Let’s start from a simple example: compute (and then plot) the number of transactions per day. This is the code, heavily commented, just go through it.

import java.io.File;
import java.text.SimpleDateFormat;
import java.util.LinkedList;
import java.util.List;
import java.util.HashMap;
import java.util.Locale;
import java.util.Map;
 
import org.bitcoinj.core.Block;
import org.bitcoinj.core.Context;
import org.bitcoinj.core.NetworkParameters;
import org.bitcoinj.core.Transaction;
import org.bitcoinj.params.MainNetParams;
import org.bitcoinj.utils.BlockFileLoader;
 
 
public class SimpleDailyTxCount {
 
	// Location of block files. This is where your blocks are located.
	// Check the documentation of Bitcoin Core if you are using
        // it, or use any other directory with blk*dat files. 
	static String PREFIX = "/path/to/your/bitcoin/blocks/";
 
        // A simple method with everything in it
	public void doSomething() {
 
		// Just some initial setup
		NetworkParameters np = new MainNetParams();
		Context.getOrCreate(MainNetParams.get());
 
		// We create a BlockFileLoader object by passing a list of files.
		// The list of files is built with the method buildList(), see
		// below for its definition.
		BlockFileLoader loader = new BlockFileLoader(np,buildList());
 
		// We are going to store the results in a map of the form 
                // day -> n. of transactions
		Map<String, Integer> dailyTotTxs = new HashMap<>();
 
		// A simple counter to have an idea of the progress
		int blockCounter = 0;
 
		// bitcoinj does all the magic: from the list of files in the loader
		// it builds a list of blocks. We iterate over it using the following
		// for loop
		for (Block block : loader) {
 
			blockCounter++;
			// This gives you an idea of the progress
			System.out.println("Analysing block "+blockCounter);
 
			// Extract the day from the block: we are only interested 
                        // in the day, not in the time. Block.getTime() returns 
                        // a Date, which is here converted to a string.
			String day = new SimpleDateFormat("yyyy-MM-dd").format(block.getTime());
 
			// Now we start populating the map day -> number of transactions.
			// Is this the first time we see the date? If yes, create an entry
			if (!dailyTotTxs.containsKey(day)) {
				dailyTotTxs.put(day, 0);
			}
 
			// The following is highly inefficient: we could simply do
			// block.getTransactions().size(), but is shows you
			// how to iterate over transactions in a block
			// So, we simply iterate over all transactions in the
			// block and for each of them we add 1 to the corresponding
			// entry in the map
			for ( Transaction tx: block.getTransactions() ) {		    	
				dailyTotTxs.put(day,dailyTotTxs.get(day)+1);
			}
		} // End of iteration over blocks
 
		// Finally, let's print the results
		for ( String d: dailyTotTxs.keySet()) {
			System.out.println(d+","+dailyTotTxs.get(d));
		}
	}  // end of doSomething() method.
 
 
	// The method returns a list of files in a directory according to a certain
	// pattern (block files have name blkNNNNN.dat)
	private List<File> buildList() {
            List<File> list = new LinkedList<File>();
            for (int i = 0; true; i++) {
                File file = new File(PREFIX + String.format(Locale.US, "blk%05d.dat", i));
                if (!file.exists())
                    break;
                list.add(file);
            }
	    return list;
	}
 
 
	// Main method: simply invoke everything
	public static void main(String[] args) {
		SimpleDailyTxCount tb = new SimpleDailyTxCount();
		tb.doSomething();
	}
 
}

This code will print on screen a list of values of the form “date, number of transactions”. Just redirect the output to a file and plot it. You should get something like this (notice the nearly exponential growth in the number of daily transactions):

dailyTxsLog

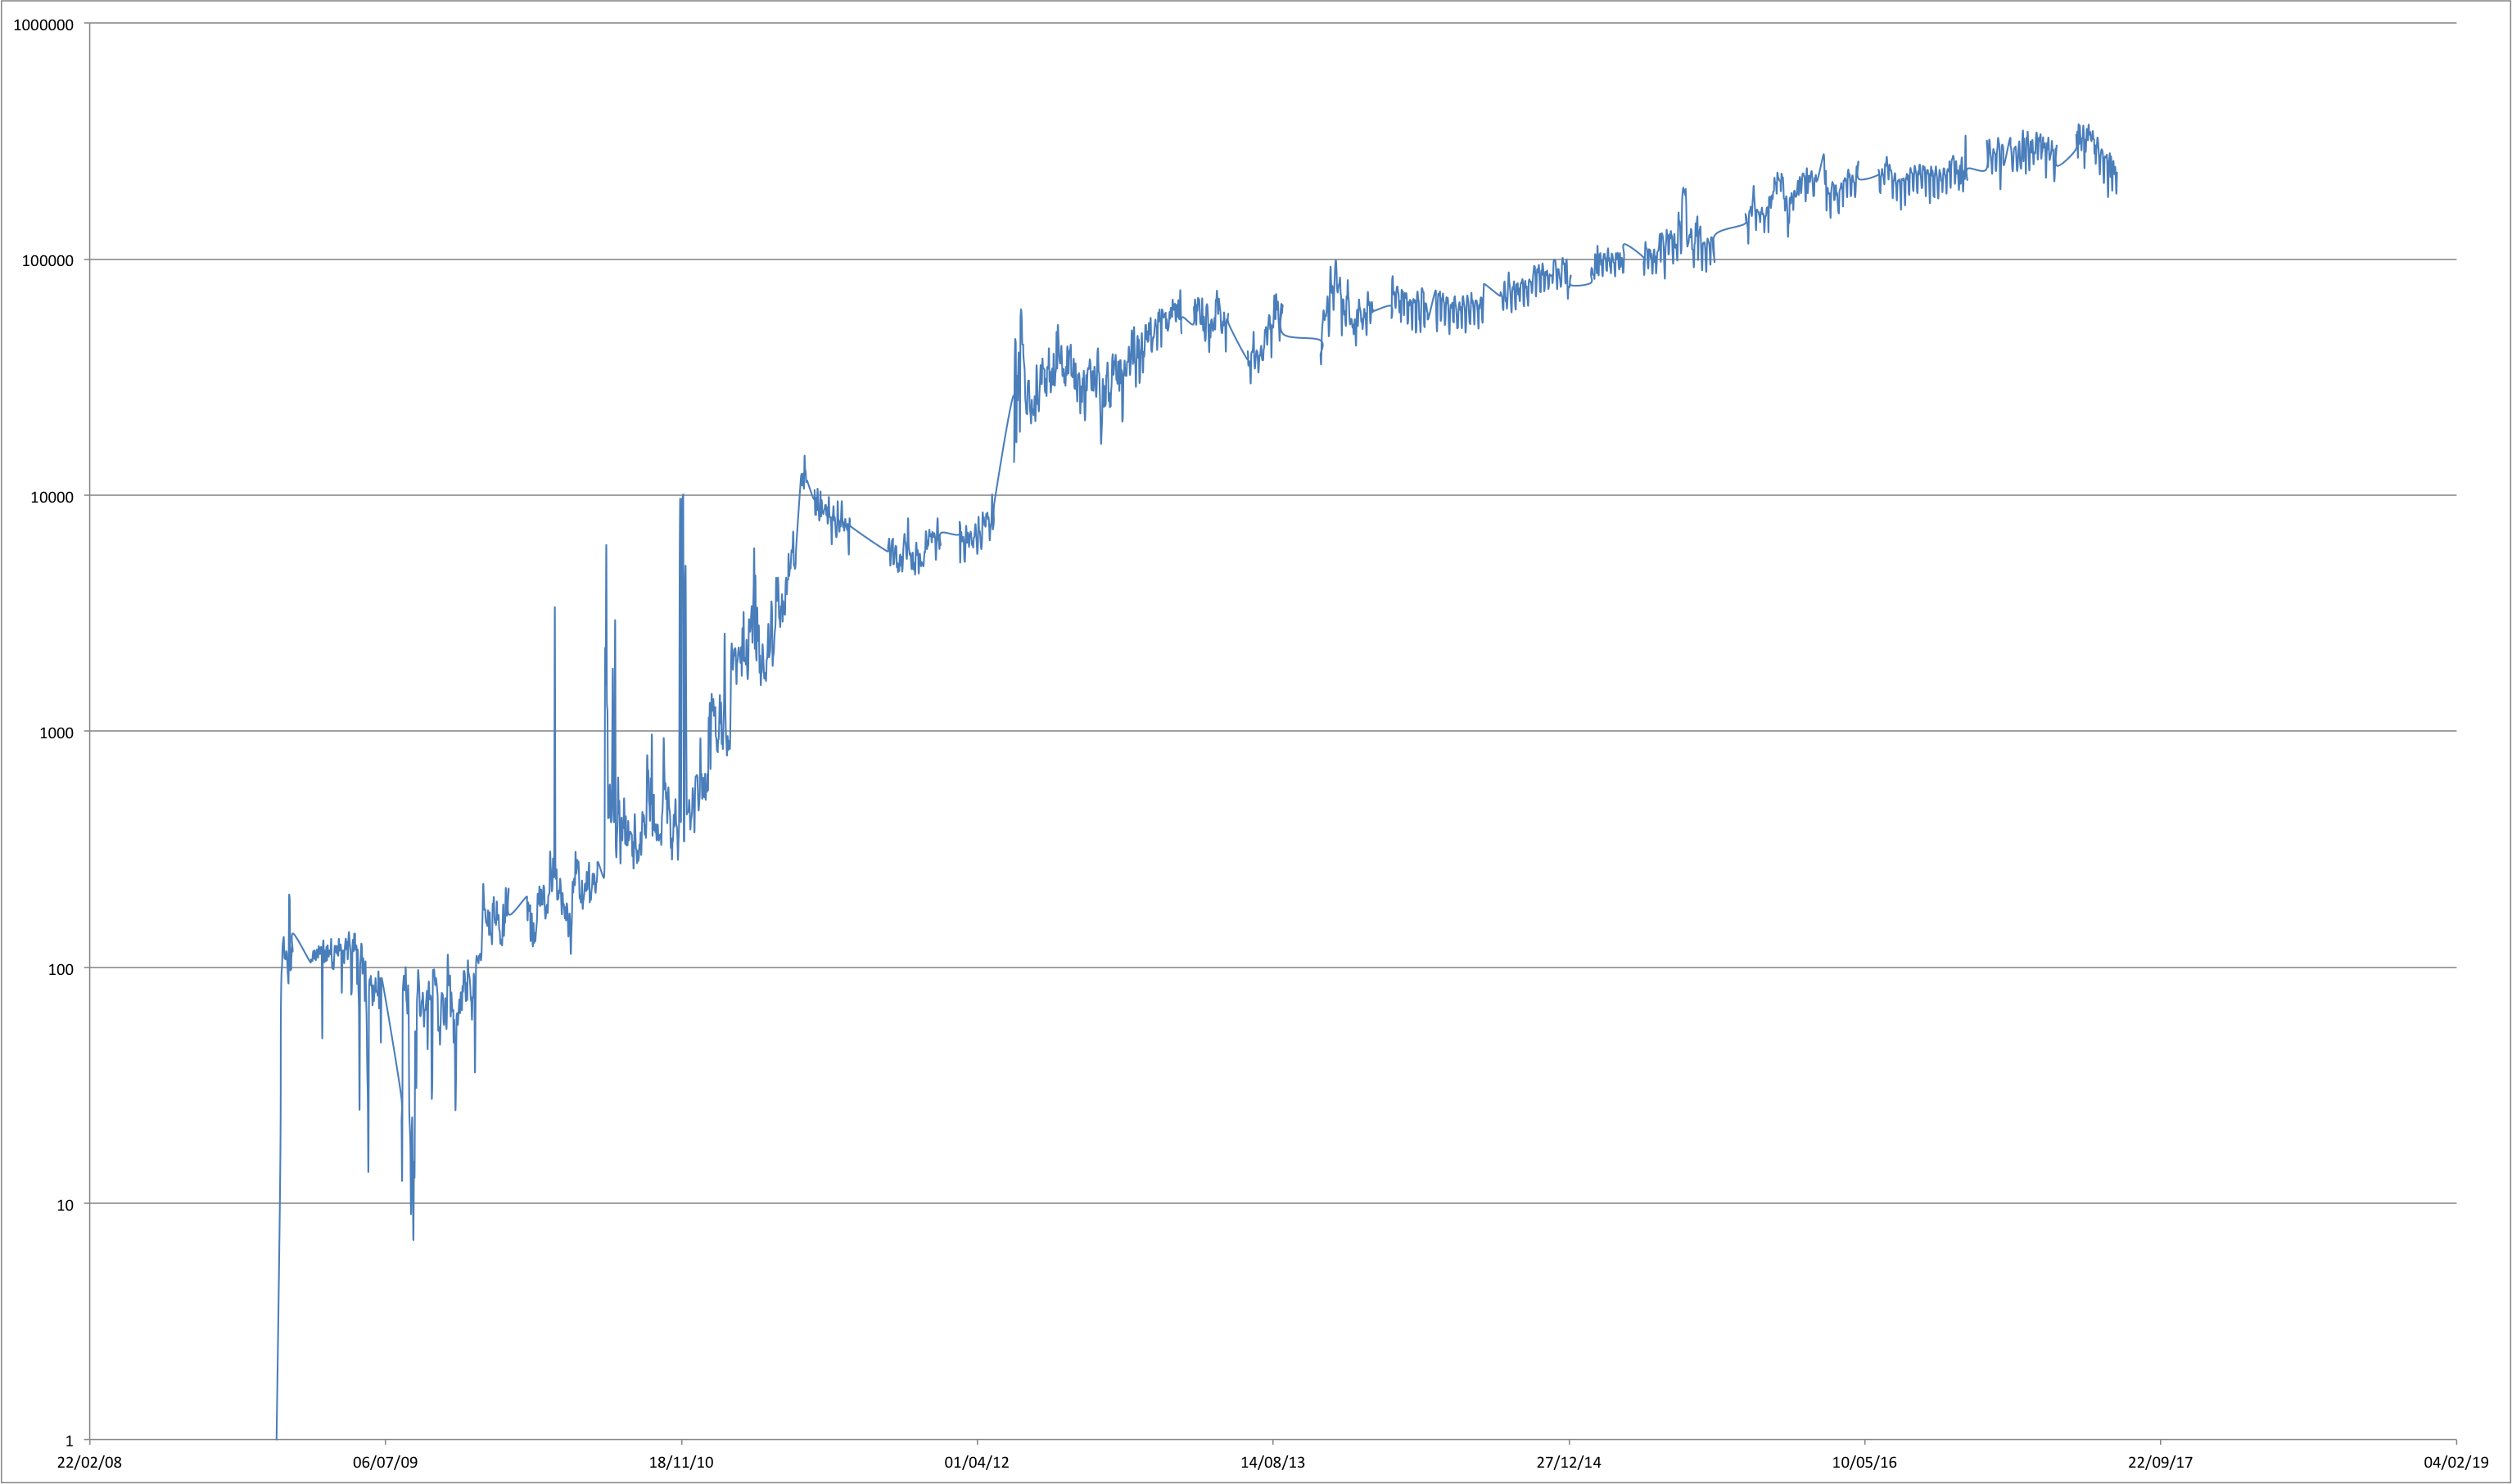
Number of transactions per day (log scale)

I am very impressed by the performance of the library: scanning the whole blockchain with the code above took approximately 35 minutes on my laptop (2014 MacBook Pro), with the blockchain stored on an external HD connected using a USB2 port. It took approximately 100% of one processor and 1 Gb of RAM at most.

A slightly more complicated example took 55 minutes: computing the daily distribution of transaction size. This requires adding a further loop in the code above to explore all the transaction outputs (and a few counters along the way). The buckets are 0-10 USD, 10-50 USD, 50-200 USD, 200-500 USD, 500-2000 USD, 2000+ USD (BTC/USD exchange rate computed by taking the average of opening and close value for the day).

TxSize

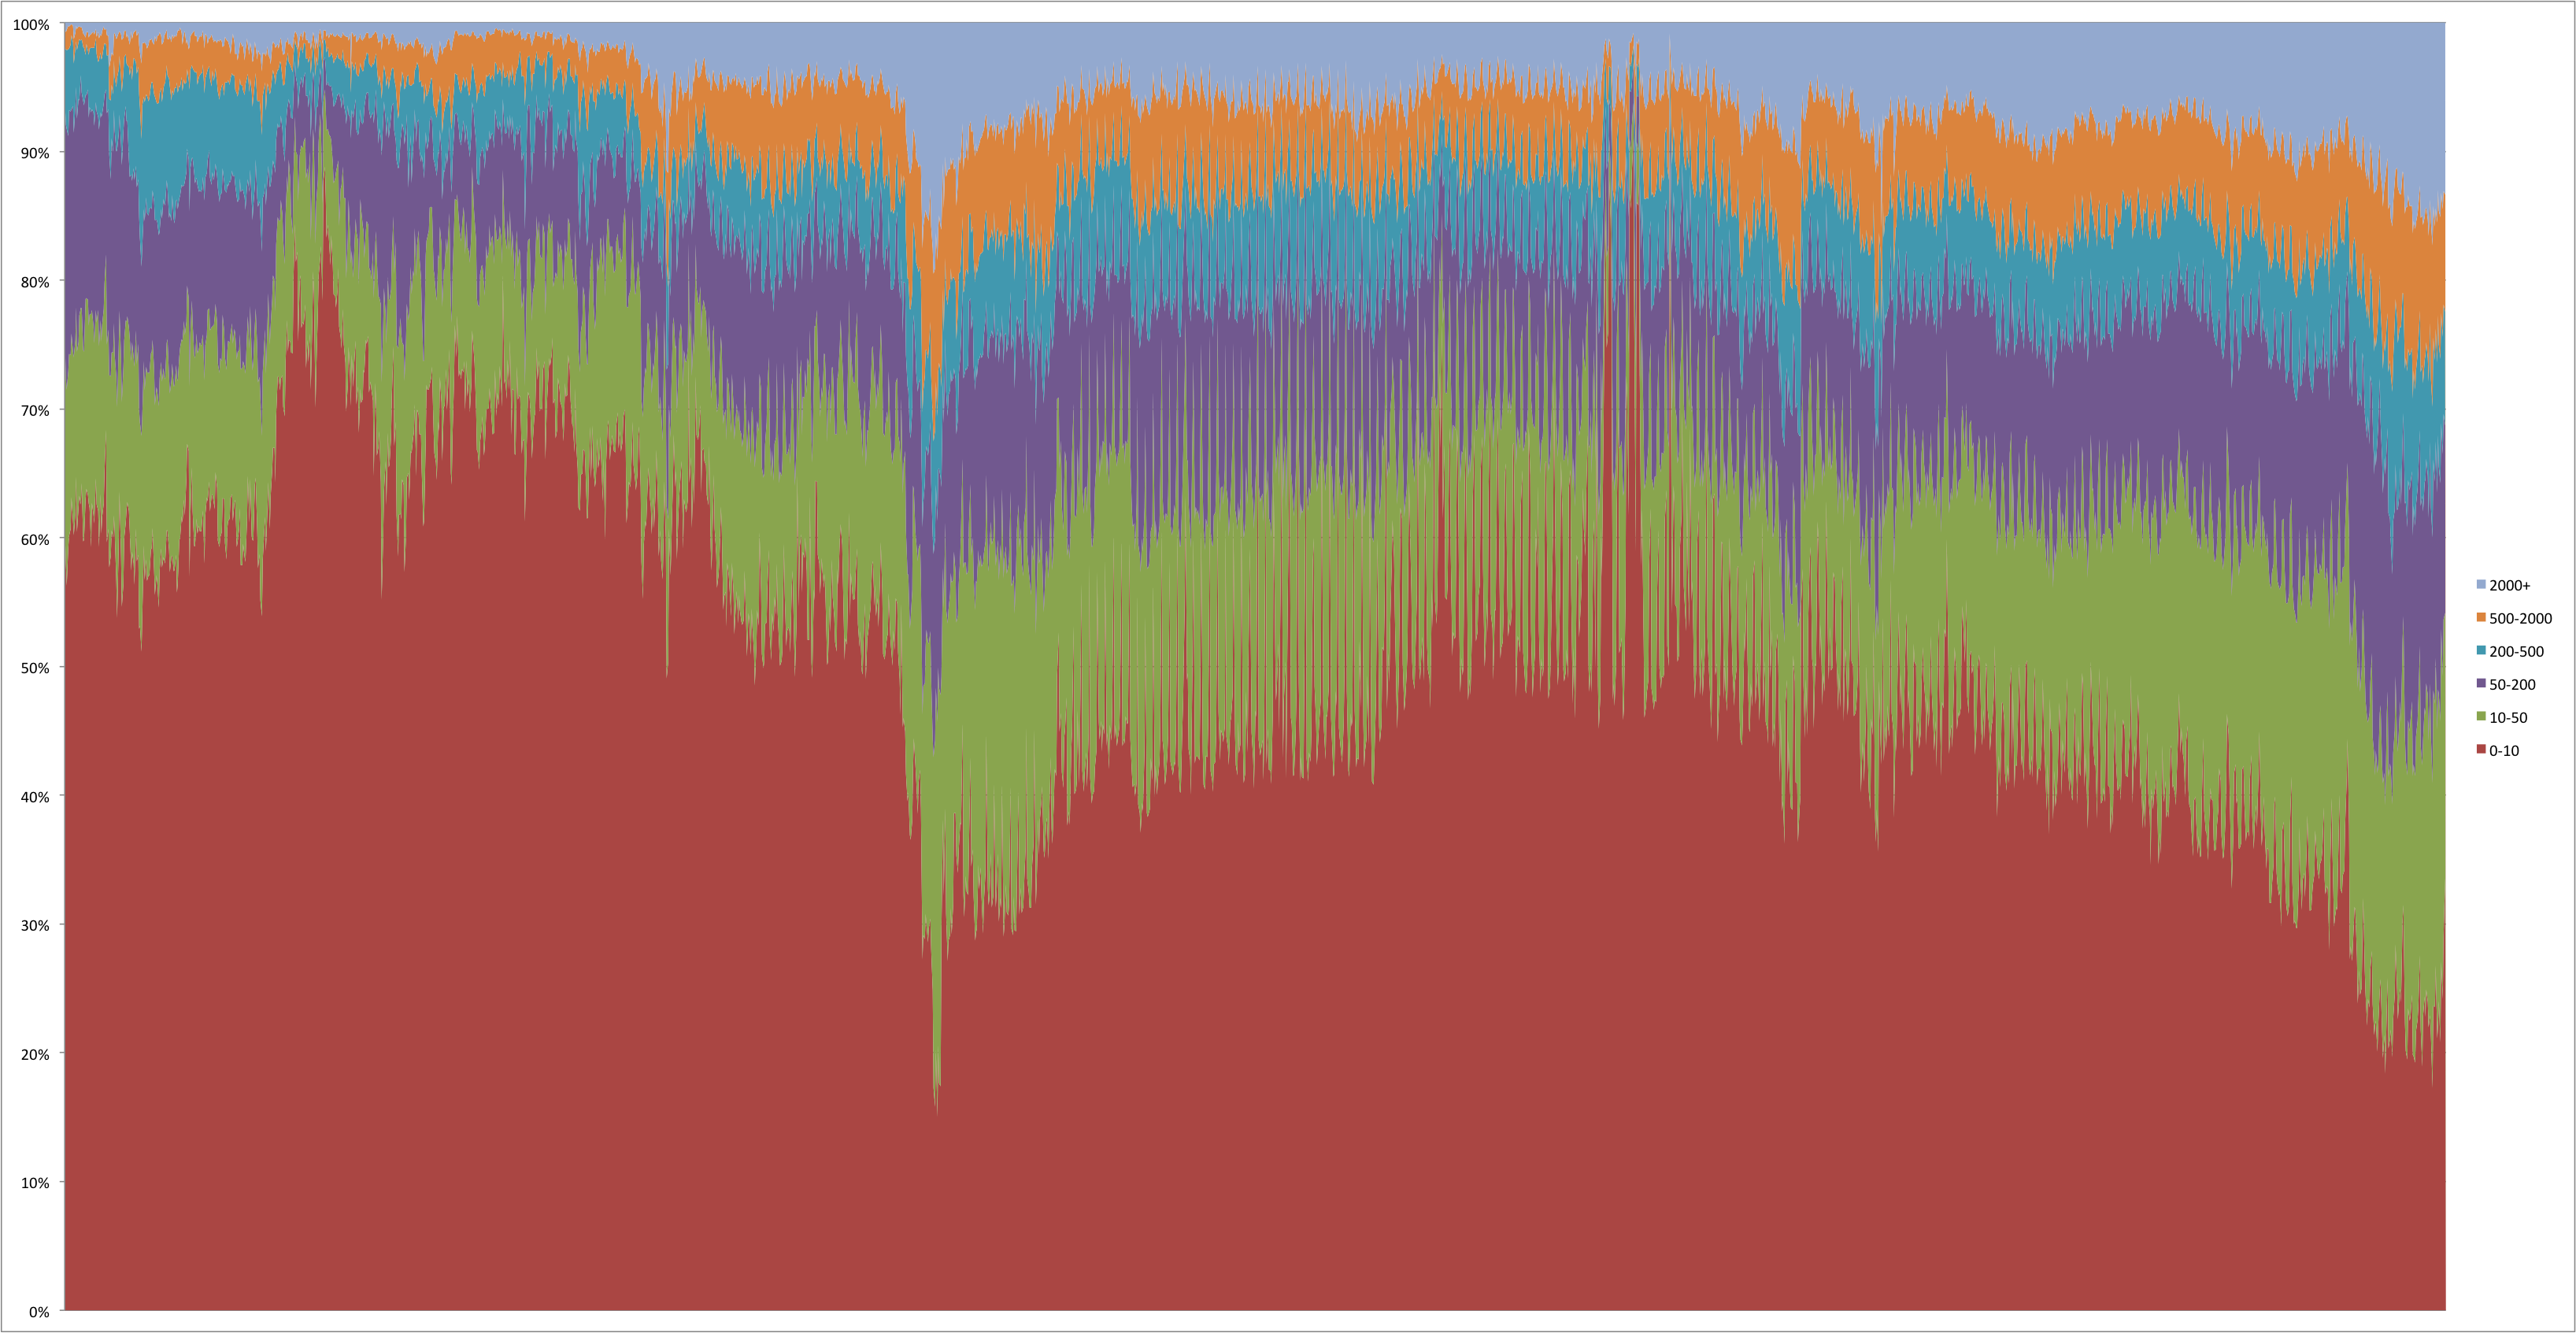
Tx size distribution (in USD), October 2011 – July 2017

Install and use OpenCV 3.0 on Mac OS X with Eclipse (Java)

A final year student is currently working on a Java project in Eclipse using OpenCV . As this is something that other students have asked me, this is a summary of what we have done by putting together a few tutorials available online:

Prerequisites: Mac OS X 10.10 and XCode 6. Before starting the installation, make sure you have:

  1. Apache Ant installed. You can install Ant using Homebrew. If you don’t have Homebrew, install it using the following command:
ruby -e "$(curl -fsSL https://raw.githubusercontent.com/Homebrew/install/master/install)"

Then, update brew with brew update and finally install Ant with brew install ant

  1. Make sure you have CMake installed. You can download a binary file for Mac here: http://www.cmake.org/download/ After extracting the .dmg file, copy it to the /Applications/ folder.

If you have Ant and CMake installed, download OpenCV 3.0 for Mac from this link: http://opencv.org/downloads.html. Extract the file and this will create a new directory called
opencv-3.0.0/ (or something similar if you use a more recent version). Open a terminal and navigate to this directory. You can now start the compilation process:

  • Run cmake with the following command:
    /Applications/CMake.app/Contents/bin/cmake CMakeLists.txt. It shouldn’t take long. Check the output and make sure that java is listed as one of the modules to be installed.
  • Type make and go for a cup of tea, the compilation process will require a few minutes…

If everything goes well you should be able to compile everything and you can now start Eclipse. I’m using Eclipse Luna but I guess the process is very similar for other versions. Following the instructions available at http://docs.opencv.org/doc/tutorials/introduction/java_eclipse/java_eclipse.html, let’s create a user library and add it to a project that will make use of OpenCV:

  • In Eclipse, open the menu Eclipse -> Preferences -> Java -> Build Path -> User Libraries.  Click “New” and enter a name, I’m using opencv-3.0.0.

Screen Shot 2015-09-04 at 20.44.11

  • Click on the name of the library so that it becomes blue, then click on the right on “Add external JARs”. Browse to the directory where you have compiled OpenCV, open the bin/ directory and select “opencv-300.jar”. The screen should look more or less like this:

Screen Shot 2015-09-04 at 20.47.15

  • Now click on Native library location (None) so that it becomes blue, then click on Edit and you should get something similar to this:

Screen Shot 2015-09-04 at 20.48.32

  • Click on “External Folder…”, and again select the directory where you have compiled OpenCV and click on the lib/ directory.  Confirm and press OK (3 times).

If you want to use the OpenCV Java API you need to create an Eclipse (Java) project and add the library created above:

Select File -> New -> Java Project. You can use any name you want, say opencv-test.

Right-click on the newly created project, select properties, then Library -> Add Library… -> User Library. Tick “opencv-3.0.0″, press finish and then OK.

You are now ready to test that everything went well. You can start with the following simple code taken from http://docs.opencv.org/doc/tutorials/introduction/java_eclipse/java_eclipse.html:

import org.opencv.core.Core;
import org.opencv.core.CvType;
import org.opencv.core.Mat;
 
public class Hello
{
   public static void main( String[] args )
   {
      System.loadLibrary( Core.NATIVE_LIBRARY_NAME );
      Mat mat = Mat.eye( 3, 3, CvType.CV_8UC1 );
      System.out.println( "mat = " + mat.dump() );
   }
}

If this code works it should print a simple matrix. If you want to try something slightly more interesting, you could try to detect a face with the following code, taken from https://blog.openshift.com/day-12-opencv-face-detection-for-java-developers/ and adapted for OpenCV 3 (make sure to change the string constants in the source code below!)

import org.opencv.core.Core;
import org.opencv.core.Mat;
import org.opencv.core.MatOfRect;
import org.opencv.core.Point;
import org.opencv.core.Rect;
import org.opencv.core.Scalar;
import org.opencv.imgcodecs.Imgcodecs;
import org.opencv.imgproc.Imgproc;
import org.opencv.objdetect.CascadeClassifier;
 
public class FaceDetector {
 
    public void run() {
 
        System.loadLibrary(Core.NATIVE_LIBRARY_NAME);
        System.out.println("Starting...");
 
        // Change this path as appropriate for your configuration.
        CascadeClassifier faceDetector = new CascadeClassifier("/PATH/TO/opencv-3.0.0/data/haarcascades/haarcascade_frontalface_alt.xml");
 
        // Change this path as appropriate, pointing it to an image with at least a face...
        Mat image = 
                Imgcodecs.imread("/Users/franco/franco.jpg");
 
        MatOfRect faceDetections = new MatOfRect();
        faceDetector.detectMultiScale(image, faceDetections);
 
        System.out.println(String.format("Detected %s faces", faceDetections.toArray().length));
 
        for (Rect rect : faceDetections.toArray()) {
            Imgproc.rectangle(image, new Point(rect.x, rect.y), new Point(rect.x + rect.width, rect.y + rect.height),
                    new Scalar(0, 255, 0));
        }
 
        // Change this path as appropriate for your system. 
        String filename = "/Users/franco/ouput.png";
        System.out.println(String.format("Done. Writing %s", filename));
        Imgcodecs.imwrite(filename, image);
    }
 
    public static void main (String[] args) {
    	FaceDetector fd = new FaceDetector();
    	fd.run();
    }
}

Calling Java from C++ on Mac OSX Mavericks with JNI and Java 8.

For a small research project I need to invoke Java from C++. More precisely, in the C++ code I need to create an object by calling a constructor and then invoke some methods. Surprisingly, I was not able to find a lot of information on-line. There are a number of tutorials to call C/C++ from Java, but not much for the other direction and very little for Java 8 on Mac. This is a very quick summary of what I’ve done, taken mainly from http://www.ibm.com/developerworks/java/tutorials/j-jni/j-jni.html and modified appropriately. Let’s start from a simple Java class, something like this:

package com.example.simple;
 
import java.util.List;
import java.util.ArrayList;
 
public class SimpleJNITest {
  List values;
 
  public SimpleJNITest() {
    values = new ArrayList();
  }
 
  public void addValue(String v) {
    values.add(v);
  }
 
  public int getSize() {
    return values.size();
  }
 
  public void printValues() {
    for (String v: values) {
      System.out.println("Value: " + v);
    }
}

This is nothing special: a simple Java class with a constructors and a few methods to add values to a list, get the list size, and print the values of the list to standard output. Save this file to SimpleJNITest.java in the directory com/example/simple (I assume you are working at the root of this directory). Now, let’s suppose you need to do the following from a C++ file:

  • Create a new object of type SimpleJNITest.
  • Add some values to this object.
  • Retrieve the number of values currently stored.
  • Invoke the printValues method to print values to screen.

The solution is the following (comments in the code. Make sure you read all the comments carefully before asking questions!).

/* Remember to include this */
#include <jni.h>
#include <cstring>
 
/* This is a simple main file to show how to call Java from C++ */
 
int main()
{
  /* The following is a list of objects provided by JNI.
     The names should be self-explanatory...
   */
  JavaVMOption options[1]; // A list of options to build a JVM from C++
  JNIEnv *env;
  JavaVM *jvm;
  JavaVMInitArgs vm_args; // Arguments for the JVM (see below)
 
  // This will be used to reference the Java class SimpleJNITest
  jclass cls;
 
  // This will be used to reference the constructor of the class
  jmethodID constructor;
 
  // This will be used to reference the object created by calling
  // the constructor of the class above:
  jobject simpleJNITestInstance;
 
  // You may need to change this. This is relative to the location
  // of the C++ executable
  options[0].optionString = "-Djava.class.path=.:./";
 
  // Setting the arguments to create a JVM...
  memset(&vm_args, 0, sizeof(vm_args));
  vm_args.version = JNI_VERSION_1_6;
  vm_args.nOptions = 1;
  vm_args.options = options;
 
 
  long status = JNI_CreateJavaVM(&jvm, (void**)&env, &vm_args);
 
  if (status != JNI_ERR) {
    // If there was no error, let's create a reference to the class.
    // Make sure that this is in the class path specified above in the
    // options array
    cls = env->FindClass("com/example/simple/SimpleJNITest");
 
    if(cls !=0) {
      printf("Class found \n");
      // As above, if there was no error...
 
      /* Let's build a reference to the constructor.
	 This is done using the GetMethodID of env.
	 This method takes 
	 (1) a reference to the class (cls)
	 (2) the name of the method. For a constructor, this is 
             <init>; for standard methods this would be the actual
             name of the method (see below).
	 (3) the signature of the method (its internal representation, to be precise). 
	     To get the signature the quickest way is to use javap. Just type:
             javap -s -p com/example/simple/SimpleJNITest.class
             And you will get the signatures of all the methods,
             including the constructor (check the "descriptor" field).
             In the case of the constructor, the signature is "()V", which
             means that the constructor does not take arguments and has no
             return value. See below for other examples.        
       */
      constructor = env->GetMethodID(cls, "<init>", "()V");
 
      if(constructor !=0 ) {
 
	printf("Constructor found \n");
	/* If there was no error, let's create an instance of the SimpleTestJNI by
	   calling its constructor
	*/
	jobject simpleJNITestInstance = env->NewObject(cls, constructor);
 
	if ( simpleJNITestInstance != 0 ) {
	  /* If there was no error, let's call some methods of the 
	     newly created instance
	  */
 
	  printf("Instance created \n");
 
	  // First of all, we create two Strings to be passed
	  // as argument to the addValue method.
	  jstring jstr1 = env->NewStringUTF("First string");
	  jstring jstr2 = env->NewStringUTF("Second string");
 
	  /* Then, we create a reference to the addValue method.
	     This is very similar to the reference to the constructor above.
	     As above, you can get the signature of the addValue method with javap.
	     In this case, the method takes a String as input and does not return
	     a value (V is for void)
	   */
 
	  jmethodID addValue = env->GetMethodID(cls, "addValue", "(Ljava/lang/String;)V");
 
	  /* Finally, let's call the method twice, with two different arguments.
	     (it would probably be a good idea to check for errors here... This is
	      left as a simple exercise to the student ;-).
	   */
	  env->CallObjectMethod(simpleJNITestInstance , addValue, jstr1);
	  env->CallObjectMethod(simpleJNITestInstance , addValue, jstr1);
 
	  /* Let's now call another Java method: printValues should print on screen
	     the content of the List of values in the object. The pattern is identical
	     to the one above, but no arguments are passed.
	  */
	  jmethodID printValues = env->GetMethodID(cls, "printValues", "()V");
	  env->CallObjectMethod(simpleJNITestInstance , printValues);
 
	  /* Finally, let's extract an int value from a method call. We need to
	     invoke CallIntMethod and we are going to use getSize of 
	     simpleJNITestInstance. Notice the signature: the 
	     method returns an int and it does not take arguments
	  */
	  jint listSize;
	  jmethodID getSize = env->GetMethodID(cls, "getSize", "()I");
	  listSize = env->CallIntMethod(simpleJNITestInstance , getSize);
 
	  printf("The size of the Java list is: %d\n", listSize);
 
        }
      }
      else {
	printf("I could not create constructor\n");
      }
    }
    jvm->DestroyJavaVM();
    printf("All done, bye bye!\n");
    return 0;
  }
  else
    return -1;
}

The code in itself is not too difficult. The main problem is getting the correct location of the various header files and libraries… To make the whole thing run, save the code above in a file (call it test.cpp) and do the following:

  • Compile the Java class: this is easy, just type
    javac com/example/simple/SimpleJNITest.java
  • Compile the C++ file: this is slightly more complicated because you need to specify various paths. The command on my machine (Mac OSX Mavericks, Java 1.8, gcc) is the following:
    g++  -o test \
     -I/Library/Java/JavaVirtualMachines/jdk1.8.0.jdk/Contents/Home/include \
     -I/Library/Java/JavaVirtualMachines/jdk1.8.0.jdk/Contents/Home/include/darwin \
     -L/Library/Java/JavaVirtualMachines/jdk1.8.0.jdk/Contents/Home/jre/lib/server/ \
     test.cpp \
     -ljvm
    

    You can remove the backslash at the end of each line if you write the command on a single line. The two -I directives tell where to find jni.h and jni_md.h; the -L (and -l) directive are used by the linker to find libjvm.dylib. If the compilation is successful, you should get an executable called test.

  • Before running test, you need to set LD_LIBRARY_PATH with the following instruction:
    export LD_LIBRARY_PATH=/Library/Java/JavaVirtualMachines/jdk1.8.0.jdk/Contents/Home/jre/lib/server/
  • From the same terminal where you have executed the command above, just type ./test.

Et voila, job done, if everything is OK you should see something like this:

$ ./test 
Class found 
Constructor found 
Instance created 
Value: First string
Value: First string
The size of the Java list is: 2
All done, bye bye!

Building an action camera using a Raspberry Pi and Java

20140625_205058I’m in charge of preparing some material for the new second year “Software Development” course here at Middlesex. As part of the new Java course I thought it would be a good idea to start exploring the Raspberry Pi GPIO (General Purpose I/O) pins with Java. These pins are very easy to use in Python, but with Java they require a bit more work (not much, don’t worry and keep reading).

Instead of just doing the usual exercises with traffic lights and digital inputs, I thought that it would be a nice idea to build a more “concrete” application. As a result, I decided to build an action camera that could be mounted on my bike helmet (by pure chance soon after after GoPro IPO 30% increase…). My plan is to have:

  1. A digital input switch (to set the camera on/off)
  2. A couple of LEDs to show the status of the application
  3. The standard Raspberry camera (the quality is excellent!)
  4. A USB WiFi dongle to make the Raspberry Pi an access point. Well, I’m not planning to use the Raspberry Pi as a router, I just would like it to set up a wireless network to which one could connect with a phone or a laptop to download the videos that are captured (TODO: I would like to implement a Racket-based web server to view the videos, delete them, etc.).

The final result (camera mounted on helmet) is shown above. This is a video made with the above set-up and with an appropriate “Twinkle twinkle Little Star” tune, given the time at which it was taken:

https://www.youtube.com/watch?v=aFguIT2qkTs

This is a picture of the wiring, see below for details:

JvPiwiring

OK, let’s start. I assume you have a working Raspbian image, a wireless dongle that works with hostapd (see http://raspberry-at-home.com/hotspot-wifi-access-point/), an input switch, a couple of LEDs and some experience with Linux and, more importantly, with Java. I’m using Java 8, but version 7 should work fine as well, see http://www.rpiblog.com/2014/03/installing-oracle-jdk-8-on-raspberry-pi.html for installation instructions. First of all you need to familiarise with the GPIO pins. This is a close-up picture of the GPIO pins (with some pins connected):

JvPi-wiring-closeup

Forget about the clarity, simplicity and engineering beauty of Arduino pins…

  • First of all, there are no numbers on the pins. Check carefully the picture above and you should see “P1″ on one of them: this is the only number you’ll get on the board.
  • There are three ways (that I know) to number the GPIO pins, and in most cases numbering is not sequential (see below).
  • The numbering has changed between Revision 1 and Revision 2
  • Revision 2 has an additional set of pins (but these are only accessible on the P5 header: turn the Raspberry Pi upside down and look for small holes: this is the P5 header). In the picture above you can see two holes to the right of R2: this is the beginning of the P5 header.

Keeping all this in mind, have a look at the table available at this link: http://wiringpi.com/wp-content/uploads/2013/03/gpio1.png. The two central columns (header) provide a progressive numbering. The columns “Name” contain the labels that are called “Board” in Python GPIO (for instance: the fourth pin on the left column from the top is called GPIO-zero-seven and 0V means “ground”). The column BCM GPIO contains another numbering (this numbering has changed between revision 1 and revision 2; for instance, BCM pin 21 in revision 1 is BCM pin 27 in revision 2). Finally, there is a “WiringPi Pin” numbering and this is the one that we are going to use with Java below. If you carefully check the picture above you’ll see, from left to right that:

  • There is one green wire connected to 0 V (ground) on header 9 and a red wire connected to WiringPi pin 1 (corresponding to GPIO 01): these will  control the red LED.
  • There is a red wire connected to WiringPi pin 2 (corresponding to GPIO 02) and a yellow one to 0 V (ground) on header 14: these will control the green LED.
  • There is a white wire connected to WiringPi pin 14 (header 23) and a purple one to 0 V (ground) on header 25. These will be connected to the on/off switch using a PULL-UP resistor (more on this later).

If you didn’t give up reading and you reached this point: congratulations, we are nearly there :-). It is now time to go back to Java and the first thing you need to do is to download Pi4J (http://pi4j.com/), a  library to “provide a bridge between the native libraries and Java for full access to the Raspberry Pi“. Get the 1.0 snapshot available at https://code.google.com/p/pi4j/downloads/list and extract it somewhere. Add this location to your Java classpath when you compile and run the code below.

You are now ready to write your first Java application to control GPIO pins. Let’s start with a very simple loop to turn a LED on and off (the famous Blink example in Arduino):

import com.pi4j.io.gpio.GpioController;
import com.pi4j.io.gpio.GpioFactory;
import com.pi4j.io.gpio.GpioPinDigitalInput;
import com.pi4j.io.gpio.GpioPinDigitalOutput;
import com.pi4j.io.gpio.Pin;
import com.pi4j.io.gpio.PinPullResistance;
import com.pi4j.io.gpio.RaspiPin;
 
//[...] add your methods here, then:
  GpioController gpio = GpioFactory.getInstance();
  GpioPinDigitalOutput redLED = gpio.provisionDigitalOutputPin(RaspiPin.GPIO_01);
  while (true) {
    // Add a try/catch block around the following:
    redLED.high();
    Thread.sleep(1000);
    redLED.low();
    Thread.sleep(1000);
  }

In the code above, you first need to import a number of packages; then, you set a GPIO controller and define an output pin attached to WiringPi pin 1 (with RaspiPin.GPIO_01). Then, the infinite loop keeps turning the LED on and off. Have a look at the documentation available online for additional examples: Pi4J is really well realised and there are plenty of examples available. For our action camera we are going to connect a red LED to GPIO_01 and a green LED to GPIO_02. These are configured as output pins. We then need an input pin and, more importantly, we need to start (or stop) recording when the state of this input pin changes. Pi4J provides a very convenient interface to detect pin changes. In the following example, we first define an implementation of this interface in the OnOffListener class:

import com.pi4j.io.gpio.event.GpioPinListenerDigital;
import com.pi4j.io.gpio.event.GpioPinDigitalStateChangeEvent;
 
public class OnOffStateListener implements GpioPinListenerDigital {
 
        @Override
	public void handleGpioPinDigitalStateChangeEvent(GpioPinDigitalStateChangeEvent event) {
            // Just print on screen for the moment
            System.out.println("State has changed");
        }
}

We then attach this listener to an input pin, as follows:

  GpioPinDigitalInput onOffSwitch = gpio.provisionDigitalInputPin(RaspiPin.GPIO_14, PinPullResistance.PULL_UP);	
  onOffSwitch.addListener(new OnOffStateListener());

Here we first define an input pin for WiringPi pin 14 and then we attach the listener defined above to this pin. Note that I define the input with a PULL_UP resistor (if you don’t know what this means, have a look at the Arduino documentation before moving to the next step!). If you try this code, you should get a message every time the input pin changes its state.

Building the full application is now a matter of gluing together these pieces and some instructions to turn the video recording on or off at each state change of the input pin. This is the full code for the main application:

package uk.ac.mdx.cs.jvpi;
 
import com.pi4j.io.gpio.GpioController;
import com.pi4j.io.gpio.GpioFactory;
import com.pi4j.io.gpio.GpioPinDigitalInput;
import com.pi4j.io.gpio.GpioPinDigitalOutput;
import com.pi4j.io.gpio.Pin;
import com.pi4j.io.gpio.PinPullResistance;
import com.pi4j.io.gpio.RaspiPin;
import com.pi4j.io.gpio.event.GpioPinDigitalStateChangeEvent;
import com.pi4j.io.gpio.event.GpioPinListenerDigital;
 
public class JvPi {
 
	// This is the controller.
	private GpioController gpio;
 
	// The current pin mapping
	private static final Pin redPin =  RaspiPin.GPIO_01;
	private static final Pin greenPin = RaspiPin.GPIO_02;
	private static final Pin switchPin = RaspiPin.GPIO_14;
 
	// The pins to which we attach LEDs
	private GpioPinDigitalOutput red,green;
 
	// this is going to be an input PULL_UP, see below.
	private GpioPinDigitalInput onOffSwitch;
 
	// set to true when capturing
	private boolean capturing;
 
	// Main method
	public JvPi() {
		this.gpio = GpioFactory.getInstance();
		this.red = gpio.provisionDigitalOutputPin(redPin);
		this.green = gpio.provisionDigitalOutputPin(greenPin);
		this.onOffSwitch = gpio.provisionDigitalInputPin(switchPin, PinPullResistance.PULL_UP);
 
		// The listener takes care of turning on and off the camera and the red LED	
		onOffSwitch.addListener(new OnOffStateListener(this));
	}
 
	public boolean isCapturing() {
		return this.capturing;
	}
 
	public void toggleCapture() {
		this.capturing = !this.capturing;
	}
 
	public GpioPinDigitalOutput getRed() {
		return this.red;
	}
 
	public GpioPinDigitalOutput getGreen() {
		return this.green;
	}
 
	public static void main(String[] args) {
		JvPi jvpi = new JvPi();
		jvpi.getGreen().high();
		System.out.println("System started");
		while (true) {
			try {
				Thread.sleep(1000);
			} catch (InterruptedException e) {
				// TODO Auto-generated catch block
				e.printStackTrace();
			}
		}
	}
 
}

The main method simply creates a new instance of JvPi that, in turn, attaches a listener to the input WiringPi pin 14. This is the code for the listener:

package uk.ac.mdx.cs.jvpi;
 
import java.io.IOException;
import java.text.SimpleDateFormat;
import java.util.Date;
 
import com.pi4j.io.gpio.event.GpioPinListenerDigital;
import com.pi4j.io.gpio.event.GpioPinDigitalStateChangeEvent;
 
public class OnOffStateListener implements GpioPinListenerDigital {
 
	private JvPi jvpi;
 
	private final String height = "720";
	private final String width = "960";
	private final String fps = "15";
	private final String destDir = "/home/pi/capture/";
 
	// Remember to add filename and extension!
	private final String startInstruction = "/usr/bin/raspivid -t 0 -h "+height+ " -w "+width+
			" -o "+destDir;
 
	private final String killInstruction = "killall raspivid";
 
	public OnOffStateListener(JvPi j) {
		this.jvpi = j;
	}
 
	@Override
	public void handleGpioPinDigitalStateChangeEvent(GpioPinDigitalStateChangeEvent event) {
        // display pin state on console
        if (this.jvpi.isCapturing()) {
          System.out.println("Killing raspivid");
          this.jvpi.getRed().low();
          killCapture();
        } else {
          System.out.println("Starting raspivid");
          this.jvpi.getRed().high();
          startCapture();
        }
        this.jvpi.toggleCapture();
 
    }
 
	private void killCapture() {
		executeCommand(this.killInstruction);
	}
 
	private void startCapture() {
		Date date = new Date() ;
		SimpleDateFormat dateFormat = new SimpleDateFormat("yyyy-MM-dd-HH-mm-ss");
		String filename = this.startInstruction + "vid-"+dateFormat.format(date) + ".h264";
		executeCommand(filename);
	}
 
	private void executeCommand(String cmd) {
		Runtime r = Runtime.getRuntime();
		try {
			r.exec(cmd);
		} catch (IOException e) {
			// TODO Auto-generated catch block
			e.printStackTrace();
		}
	}
 
 
}

As you can see, the code invokes raspivid if it was not capturing and it kills the raspivid process if it was running (TODO: improve error checking :-)! A number of default options, such as resolution and frame rate, can be configured here. The video is recorded to a file whose name is obtained from the current system date and time.

I have used a very basic box to store everything and I have attached the box to the helmet using electric tape: this is definitely not the ideal solution, but it is good enough for a proof of concept.

As usual, drop me an email (or leave a comment) if you have questions!