Category Archives: final year projects

Exploring the Bitcoin blockchain using Java

[This is a short summary of material that I prepared for final year project students]

I assume that you already have a vague idea of what a bitcoin is and you have a simple understanding of the mechanisms behind transactions: payments are made to addresses (that are anonymous, in the sense that they cannot be directly linked to a specific individual), and all transactions are public. Transactions are collected in blocks, and blocks are chained together in the blockchain.

You can think of the blockchain as a big database that is continuously updated and is accessible to everyone. You can download the full blockchain using a software like Bitcoin Core. After installing the software, it will take a couple of weeks for your installation to synchronise. Notice that, at the time of writing, the blockchain has a size of over 130 Gb, take this into consideration…

If you have blockchain data available (not necessarily the whole blockchain, you can also work on subsets of it), it can be analysed using Java. You could do all the work from scratch and read raw data from the files etc. Let’s skip this step and use a library instead. There are several options available in most programming languages. I’m going to use Java and the bitcoinj library. This is a big library that can be used to build applications like wallets, on-line payments, etc. I am going to use just its parsing features for this post.

First of all download the jar file for the library at https://bitcoinj.github.io/ (I’m using https://search.maven.org/remotecontent?filepath=org/bitcoinj/bitcoinj-core/0.14.4/bitcoinj-core-0.14.4-bundled.jar). Then, download SLF4J (https://www.slf4j.org/download.html), extract it, and get the file called slf4j-simple-x.y.z.jar (in my case: slf4j-simple-1.7.25.jar). Add these two jar files to your classpath and you are ready to go.

Let’s start from a simple example: compute (and then plot) the number of transactions per day. This is the code, heavily commented, just go through it.

import java.io.File;
import java.text.SimpleDateFormat;
import java.util.LinkedList;
import java.util.List;
import java.util.HashMap;
import java.util.Locale;
import java.util.Map;
 
import org.bitcoinj.core.Block;
import org.bitcoinj.core.Context;
import org.bitcoinj.core.NetworkParameters;
import org.bitcoinj.core.Transaction;
import org.bitcoinj.params.MainNetParams;
import org.bitcoinj.utils.BlockFileLoader;
 
 
public class SimpleDailyTxCount {
 
	// Location of block files. This is where your blocks are located.
	// Check the documentation of Bitcoin Core if you are using
        // it, or use any other directory with blk*dat files. 
	static String PREFIX = "/path/to/your/bitcoin/blocks/";
 
        // A simple method with everything in it
	public void doSomething() {
 
		// Just some initial setup
		NetworkParameters np = new MainNetParams();
		Context.getOrCreate(MainNetParams.get());
 
		// We create a BlockFileLoader object by passing a list of files.
		// The list of files is built with the method buildList(), see
		// below for its definition.
		BlockFileLoader loader = new BlockFileLoader(np,buildList());
 
		// We are going to store the results in a map of the form 
                // day -> n. of transactions
		Map<String, Integer> dailyTotTxs = new HashMap<>();
 
		// A simple counter to have an idea of the progress
		int blockCounter = 0;
 
		// bitcoinj does all the magic: from the list of files in the loader
		// it builds a list of blocks. We iterate over it using the following
		// for loop
		for (Block block : loader) {
 
			blockCounter++;
			// This gives you an idea of the progress
			System.out.println("Analysing block "+blockCounter);
 
			// Extract the day from the block: we are only interested 
                        // in the day, not in the time. Block.getTime() returns 
                        // a Date, which is here converted to a string.
			String day = new SimpleDateFormat("yyyy-MM-dd").format(block.getTime());
 
			// Now we start populating the map day -> number of transactions.
			// Is this the first time we see the date? If yes, create an entry
			if (!dailyTotTxs.containsKey(day)) {
				dailyTotTxs.put(day, 0);
			}
 
			// The following is highly inefficient: we could simply do
			// block.getTransactions().size(), but is shows you
			// how to iterate over transactions in a block
			// So, we simply iterate over all transactions in the
			// block and for each of them we add 1 to the corresponding
			// entry in the map
			for ( Transaction tx: block.getTransactions() ) {		    	
				dailyTotTxs.put(day,dailyTotTxs.get(day)+1);
			}
		} // End of iteration over blocks
 
		// Finally, let's print the results
		for ( String d: dailyTotTxs.keySet()) {
			System.out.println(d+","+dailyTotTxs.get(d));
		}
	}  // end of doSomething() method.
 
 
	// The method returns a list of files in a directory according to a certain
	// pattern (block files have name blkNNNNN.dat)
	private List<File> buildList() {
            List<File> list = new LinkedList<File>();
            for (int i = 0; true; i++) {
                File file = new File(PREFIX + String.format(Locale.US, "blk%05d.dat", i));
                if (!file.exists())
                    break;
                list.add(file);
            }
	    return list;
	}
 
 
	// Main method: simply invoke everything
	public static void main(String[] args) {
		SimpleDailyTxCount tb = new SimpleDailyTxCount();
		tb.doSomething();
	}
 
}

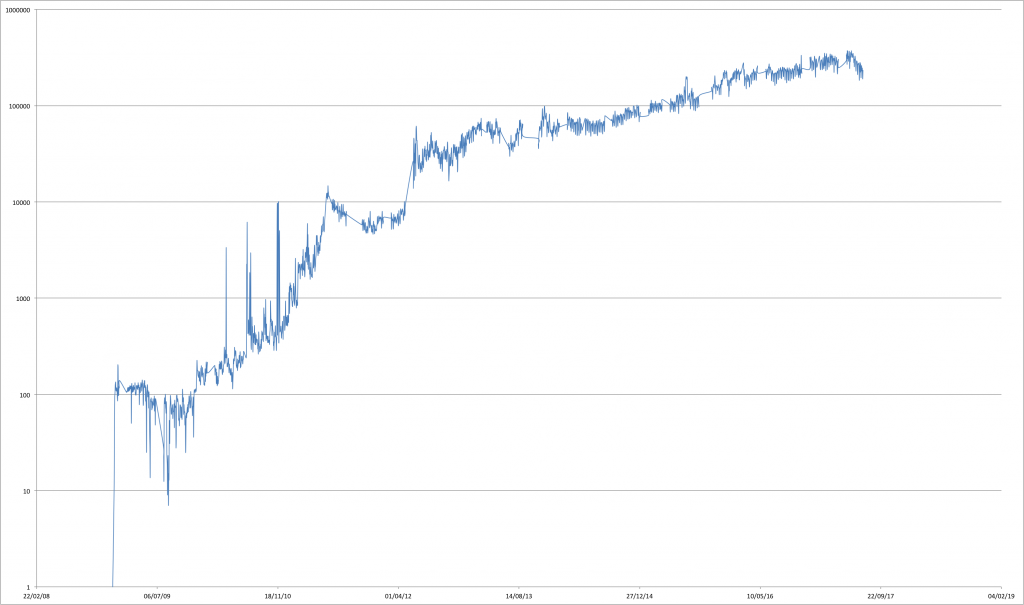
This code will print on screen a list of values of the form “date, number of transactions”. Just redirect the output to a file and plot it. You should get something like this (notice the nearly exponential growth in the number of daily transactions):

dailyTxsLog

Number of transactions per day (log scale)

I am very impressed by the performance of the library: scanning the whole blockchain with the code above took approximately 35 minutes on my laptop (2014 MacBook Pro), with the blockchain stored on an external HD connected using a USB2 port. It took approximately 100% of one processor and 1 Gb of RAM at most.

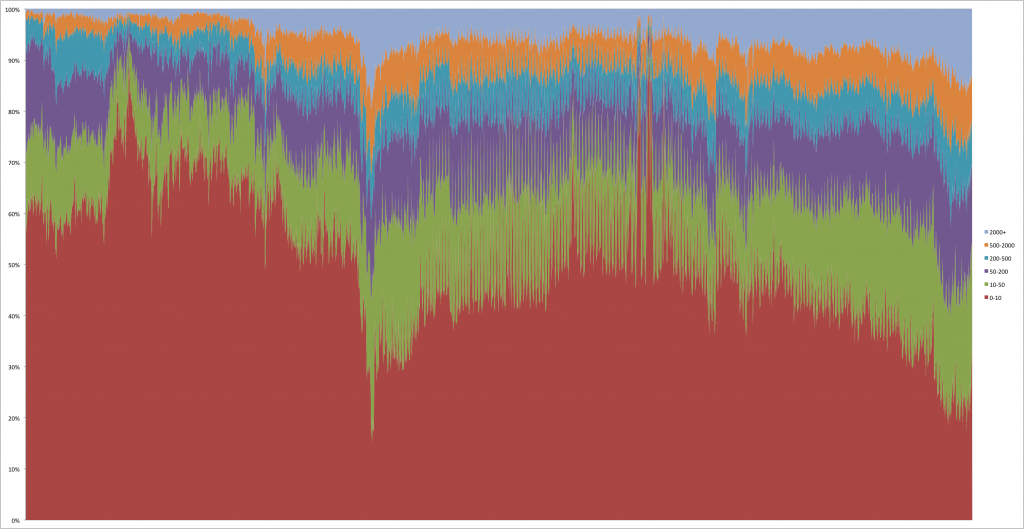
A slightly more complicated example took 55 minutes: computing the daily distribution of transaction size. This requires adding a further loop in the code above to explore all the transaction outputs (and a few counters along the way). The buckets are 0-10 USD, 10-50 USD, 50-200 USD, 200-500 USD, 500-2000 USD, 2000+ USD (BTC/USD exchange rate computed by taking the average of opening and close value for the day).
TxSize

Tx size distribution (in USD), October 2011 – July 2017

Install and use OpenCV 3.0 on Mac OS X with Eclipse (Java)

A final year student is currently working on a Java project in Eclipse using OpenCV . As this is something that other students have asked me, this is a summary of what we have done by putting together a few tutorials available online:

Prerequisites: Mac OS X 10.10 and XCode 6. Before starting the installation, make sure you have:

  1. Apache Ant installed. You can install Ant using Homebrew. If you don’t have Homebrew, install it using the following command:
ruby -e "$(curl -fsSL https://raw.githubusercontent.com/Homebrew/install/master/install)"

Then, update brew with brew update and finally install Ant with brew install ant

  1. Make sure you have CMake installed. You can download a binary file for Mac here: http://www.cmake.org/download/ After extracting the .dmg file, copy it to the /Applications/ folder.

If you have Ant and CMake installed, download OpenCV 3.0 for Mac from this link: http://opencv.org/downloads.html. Extract the file and this will create a new directory called
opencv-3.0.0/ (or something similar if you use a more recent version). Open a terminal and navigate to this directory. You can now start the compilation process:

  • Run cmake with the following command:
    /Applications/CMake.app/Contents/bin/cmake CMakeLists.txt. It shouldn’t take long. Check the output and make sure that java is listed as one of the modules to be installed.
  • Type make and go for a cup of tea, the compilation process will require a few minutes…

If everything goes well you should be able to compile everything and you can now start Eclipse. I’m using Eclipse Luna but I guess the process is very similar for other versions. Following the instructions available at http://docs.opencv.org/doc/tutorials/introduction/java_eclipse/java_eclipse.html, let’s create a user library and add it to a project that will make use of OpenCV:

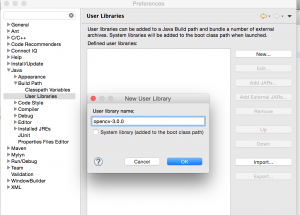
  • In Eclipse, open the menu Eclipse -> Preferences -> Java -> Build Path -> User Libraries.  Click “New” and enter a name, I’m using opencv-3.0.0.

Screen Shot 2015-09-04 at 20.44.11

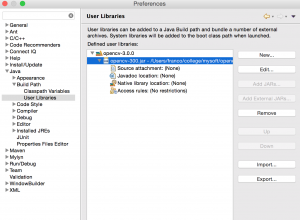
  • Click on the name of the library so that it becomes blue, then click on the right on “Add external JARs”. Browse to the directory where you have compiled OpenCV, open the bin/ directory and select “opencv-300.jar”. The screen should look more or less like this:

Screen Shot 2015-09-04 at 20.47.15

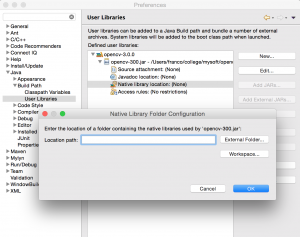
  • Now click on Native library location (None) so that it becomes blue, then click on Edit and you should get something similar to this:

Screen Shot 2015-09-04 at 20.48.32

  • Click on “External Folder…”, and again select the directory where you have compiled OpenCV and click on the lib/ directory.  Confirm and press OK (3 times).

If you want to use the OpenCV Java API you need to create an Eclipse (Java) project and add the library created above:

Select File -> New -> Java Project. You can use any name you want, say opencv-test.

Right-click on the newly created project, select properties, then Library -> Add Library… -> User Library. Tick “opencv-3.0.0″, press finish and then OK.

You are now ready to test that everything went well. You can start with the following simple code taken from http://docs.opencv.org/doc/tutorials/introduction/java_eclipse/java_eclipse.html:

import org.opencv.core.Core;
import org.opencv.core.CvType;
import org.opencv.core.Mat;
 
public class Hello
{
   public static void main( String[] args )
   {
      System.loadLibrary( Core.NATIVE_LIBRARY_NAME );
      Mat mat = Mat.eye( 3, 3, CvType.CV_8UC1 );
      System.out.println( "mat = " + mat.dump() );
   }
}

If this code works it should print a simple matrix. If you want to try something slightly more interesting, you could try to detect a face with the following code, taken from https://blog.openshift.com/day-12-opencv-face-detection-for-java-developers/ and adapted for OpenCV 3 (make sure to change the string constants in the source code below!)

import org.opencv.core.Core;
import org.opencv.core.Mat;
import org.opencv.core.MatOfRect;
import org.opencv.core.Point;
import org.opencv.core.Rect;
import org.opencv.core.Scalar;
import org.opencv.imgcodecs.Imgcodecs;
import org.opencv.imgproc.Imgproc;
import org.opencv.objdetect.CascadeClassifier;
 
public class FaceDetector {
 
    public void run() {
 
        System.loadLibrary(Core.NATIVE_LIBRARY_NAME);
        System.out.println("Starting...");
 
        // Change this path as appropriate for your configuration.
        CascadeClassifier faceDetector = new CascadeClassifier("/PATH/TO/opencv-3.0.0/data/haarcascades/haarcascade_frontalface_alt.xml");
 
        // Change this path as appropriate, pointing it to an image with at least a face...
        Mat image = 
                Imgcodecs.imread("/Users/franco/franco.jpg");
 
        MatOfRect faceDetections = new MatOfRect();
        faceDetector.detectMultiScale(image, faceDetections);
 
        System.out.println(String.format("Detected %s faces", faceDetections.toArray().length));
 
        for (Rect rect : faceDetections.toArray()) {
            Imgproc.rectangle(image, new Point(rect.x, rect.y), new Point(rect.x + rect.width, rect.y + rect.height),
                    new Scalar(0, 255, 0));
        }
 
        // Change this path as appropriate for your system. 
        String filename = "/Users/franco/ouput.png";
        System.out.println(String.format("Done. Writing %s", filename));
        Imgcodecs.imwrite(filename, image);
    }
 
    public static void main (String[] args) {
    	FaceDetector fd = new FaceDetector();
    	fd.run();
    }
}

Who is talking about pizza in London?

Some of my students are interested in using Twitter data for their projects, and some others are interested in developing network applications. In this post I show how to retrieve data from the Twitter stream and how to manipulate it with server-side Javascript using node.js. In particular: I will build a stream of all the geo-tagged tweets from London talking about pizza.

DISCLAIMER: I am not an advocate of node.js. The same thing could be done in Python, Ruby, you-name-it. I am using node.js because 1) my students are familiar with Java and 2) the code is very short.

OK let’s start from a quick introduction to the Twitter stream API: there is a sample stream available from https://stream.twitter.com/1/statuses/sample.json. This stream will return a random sample of tweets (notice: this is a lot of data!). You can connect to this stream in a number of ways, the easiest is from the command line using curl (this works on Mac and Linux, I don’t know in Windows. You obiously need to have a Twitter account for this):

$ curl --user YOURUSERNAME:YOURPASSWORD https://stream.twitter.com/1.1/statuses/sample.json

This will display a long list of tweets in JSON format. You can even point your browser to this address and see what happens. From the command line you could redirect the output to a file to be processed at a later stage, but it is probably a better idea to retrieve only the tweets that are relevant to you.

In my case, I am interested in tweets originating from London and containing certain keywords. Twitter provides an end-point for this, see https://dev.twitter.com/docs/api/1.1/post/statuses/filter. In particular, one can retrieve all the tweets containing specific keywords, or originating from a certain location (assuming the user provides this information). Again, there are a number of ways to connect to this end-point. If you want to use Python, there is a very simple class called tweetstream that can help you with this; otherwise, you can still use curl passing the parameters in the appropriate way:

curl --user YOURUSERNAME:YOURPASSWORD -d "track=pizza" https://stream.twitter.com/1.1/statuses/filter.json

Irrespective of the technology you use to connect, there are two key things to keep in mind:

  1. The filtered stream is not a sample, it’s the full set of tweets satisfying your query (subject to certain limits).
  2. If you provide more than one condition (e.g. a location and a list of keywords), the API will return all the tweets satisying any of the two. If you want the tweets that satisfy both conditions (e.g., all the tweets talking about pizza in London) you need to retrieve all the tweets from London, and then filter them locally. This is what I am going to do below.

Let’s now move to retrieving the tweets and displaying them in real time. Download node.js for your platform from this link: http://nodejs.org/download/ (I am using the binary version 0.10.1)

Extract the archive and try to write a simple http server. This is taken from http://nodejs.org/ and is a simple http reserve running on port 8080 and returning the string Hello World! to all requests:

1
2
3
4
5
6
var http = require('http');
http.createServer(function (req, res) {
  res.writeHead(200, {'Content-Type': 'text/plain'});
  res.end('Hello World\n');
}).listen(8080, 'YOUR IP ADDRESS HERE');
console.log('Server running at http://YOUR IP ADDRESS HERE:8080/');

(obviously: put your IP address in the right place and make sure you don’t have firewalls blocking port 8080 etc). Save this code in a file, for instance test.js, and then run it with:

$ /path/to/node/bin/node test.js

Point your browser to the IP address on port 8080 and you should see Hello World!

The next step is to connect to the Twitter streaming API using node.js. To this end, I use this client: https://github.com/ttezel/twit. Just get it and install it (follow the on-line instructions, it should be very easy).

Before connecting to the Twitter API, go to https://dev.twitter.com/apps/new and create an application. You need to get a consumer_key, a consumer_secret, an access_token, and an access_token_secret. At this point you can connect to the Twitter streaming filter with the following code:

1
2
3
4
5
6
7
8
9
10
11
12
var Twit = require('twit')
var T = new Twit({
    consumer_key:         '...'
  , consumer_secret:      '...'
  , access_token:         '...'
  , access_token_secret:  '...'
})
var london =  [ '-0.489','51.28','0.236','51.686']
var stream = T.stream('statuses/filter', { locations: london })
stream.on('tweet', function (tweet) {
  console.log(tweet)
})

Fill in your keys, save the file and try to run it: you should see a stream of tweets from London (the bounding box is derived from openstreetmap).

I now put the two things together: I will stream the tweets using an http server. The code is the following:

1
2
3
4
5
6
7
8
9
10
11
12
13
14
15
16
17
18
19
20
21
22
23
24
25
26
var Twit = require('twit')
var http = require('http')
var url = require("url")
 
var T = new Twit({
    consumer_key:         '...'
  , consumer_secret:      '...'
  , access_token:         '...'
  , access_token_secret:  '...'
})
 
var london = [ '-0.489','51.28','0.236','51.686']
var stream = T.stream('statuses/filter', { locations: london })
 
var server = http.createServer(function (req, res) {
  var uri = url.parse(req.url).pathname;
  if(uri === "/pizzastream") {
    console.log("Request received");
    stream.on('tweet', function(tweet) {
      if(tweet.text.toLowerCase().indexOf("pizza") &gt; -1) {
        res.write(tweet.user.name+" says: "+tweet.text);
      }
    });
  }
});
server.listen(8080);

The code is as follows: line 13 creates a variable called stream that includes the stream originating from the Twitter API. Line 15 creates a variable called http for the http server. In line 16 and 17 we check whether the requested URL is /pizzastream. If this is the case, every time there is new data on the Twitter stream (line 19), if the text of the tweet contains the word “pizza” (line 20), I write the name of the user and the text of the tweet to the http stream (line 21). Notice how the value of the various fields is accessed using tweet.text and tweet.user.name (other fields are available, check the full JSON output). You can check the actual output by pointing your browser to the address of the machine running this code, for instance http://192.168.0.10:8080/pizzastream.

The code should be improved to include an “else” statement for the if condition in line 17. Also, the stream should be kept “alive” when there is no data: have a look at the documentation available at this link: http://nodejs.org/api/stream.html

Choosing a project supervisor

Dear students,

given that the deadline for choosing a supervisor is coming up soon, a friend of mine has suggested that I post a “serious” set of recommendations for now… So here are the suggestions I have (and that I keep repeating to my students):

First of all, try to think of the following:

  • What would you like to do? I don’t mean what would you like to do now, I really mean: what would you like to do when you finish your studies? Do you want to be a programmer? Do you want to be an analyst? What is your favourite activity? Think of your future, and use the final year project as a way to reach what you want to do / what you want to be.
  • You need to do a good job in your final year project: not only it will contribute substantially to your final mark, but you can also use your project in your job applications. It needs to identify a problem and you need to show your solution, and more importantly your path to reach that solution.

At this point, you can start looking for your supervisor. Look for someone with a research interest close to the topic you like, or someone teaching a similar subject. Have a look at the staff pages (start from http://www.cs.mdx.ac.uk). Don’t be shy: send emails and, more importantly, go to lecturers’ office hours! (check the right-hand side for my office hours).

  • Be prepared to change your topic. In a number of cases your project may be too ambitious for the short time you have, or maybe a solution exists already (in this case you could try to improve the solution)
  • Don’t try to copy someone else’s structure or topic: remember, you have to do what you like!
  • Have a look at the material that is available online (myunihub). In particular, have a look at how you will be assessed: it is important to develop a product or to obtain results, but it is equally important to do a literature review, requirements anakysis, and design. An excellent piece of software without documentation is not enough, remember that you need to show your path.