Category Archives: csd1000

Racket and TinyOS via USB

IMG_20131029_151628Communication between a PC and a TinyOS mote is normally achieved using Java. But what if you want to use Racket?

Here I give a very simple overview of how packets from a TinyOS mote connected via USB to a Linux or Mac machine can be read using Racket (I have not tried Win). An advantage of this approach is that it does not require the installation of TinyOS, which could be quite cumbersome… However, it may be a good idea to have a working installation of TinyOS on your machine so that you can modify the code on the motes. It would be beneficial to have at least a bit of familiarity with nesC (no need to be able to write code, just to understand a little bit what is going on).

As an example, I start from a simple application that broadcasts temperature and humidity. The application can be installed on various motes (just 2 in my configuration) and then a base station collects all the readings. In my case the base station is connected to the PC using a USB port. In my configuration I have a Ubuntu virtual machine running on a Mac where I have configured the TinyOS environment and Racket is running in this virtual machine. The same code runs directly on Mac. We are only interested in the structure of the message being broadcasted. This is a small variation of the standard examples that can normally be found in a .h header file; in my example the header file contains the following:

1
2
3
4
5
typedef nx_struct BlinkToRadioMsg {
  nx_uint16_t nodeid;
  nx_uint16_t humidity;
  nx_uint16_t temperature;
} BlinkToRadioMsg;

This says that each message contains 2 bytes (16 bits) for nodeid, 2 bytes for humidity and 2 bytes for the temperature, for a total of 6 bytes. Messages are transmitted in TinyOS packets over the wire, and these packets have a special format. See Section 3.6 of the document available at http://www.tinyos.net/tinyos-2.x/doc/html/tep113.html if you want more information. In summary, a packet looks like this:

7e 45 00 ff ff 00 01 06 22 06 00 01 04 5c 18 69 37 6b 7e

where the sequence 7e is a reserved sequence to denote the start and the end of a packet. The actual payload (i.e., the 6 bytes we want to receive) in our case is the sequence “00 01 04 5c 18 69″, where “00 01″ is nodeid, “04 5c” are the two bytes for humidity and “18 69″ are the two bytes for temperature. The rest of the packet includes a CRC check, protocol ID, etc. See link above if you are interested in the details.

To read these packets I modify a little bit the code that is used in firmata.rkt to communicate with an Arduino board using firmata. The idea is simple: I create an input file attached to the USB port and I keep reading bytes. When I recognise a packet, I parse it an print the values of ID, humidity and temperature on screen. Let’s start by creating the input file:


1
2
3
4
5
6
7
8
9
10
11
12
13
14
15
16
17
18
;; This is the input file to be defined below
(define in null)
 
;; This is used to open the connection and to launch the reading loop
;; You typically launch it with (open-port "/dev/ttyUSB0)"
;; (check the port name with the command-line instruction motelist)
(define (open-port port-name)
  (printf "Racket-TinyOS starting... please wait\n")
 
  ;; This is used to associate the port to the file
  (set! in (open-input-file port-name #:mode 'binary))
  (if (system (string-append "stty -F " port-name " 115200 cs8 cread clocal"))
    (begin
     (read-loop) ;; see below for the definition of this
    )
    (error "Could not connect to " port-name)
  )
)

The (read-loop) simply reads one byte at a time and calls itself:

1
2
3
4
(define (read-loop)
  (process-input (read-byte in))
  (read-loop)
)

The function (process-input) is where the packet is built:

1
2
3
4
5
6
7
8
9
10
11
12
13
14
15
16
17
18
19
20
21
22
23
24
25
26
27
28
29
30
;; This is where we store the packet
(define packet null)
 
;; These are used to define the end-of-packet and start-of-packet sequences
(define sop #x7e) ;; start of packet
(define eop #x7e) ;; end of packet
 
;; These are used to record the fact that an end-of-packet 
;; (or start-of-packet) have been received
(define eop-rec 0) ;; end-of-packet received
(define sop-rec 0) ;; start-of-packet received
 
(define (process-input data)
  ;; First of all we add the byte to the packet
  (set! packet (cons data packet))
  (cond ( (and (= eop-rec 0) (= data eop))
          ;; If it is an end-of-packet sequence, we record it
          (set! eop-rec 1)
          )
        ( (and (= eop-rec 1) (= data sop))
          ;; If we find a start of packet after an end-of-packet we parse
          ;; the packet (we have to reverse it, because it was built in
          ;; the opposite order)
          (parse-packet (reverse packet))
          ;; and then we start again and we empty the packet.
          (set! eop-rec 0)
          (set! packet null)
          )
        )
)

Up to this point the code is re-usable for any packet content. In the function (parse-packet), instead, we have to process the bytes according to the message format defined in the header file (see above). This function is defined as follows:

1
2
3
4
5
6
7
8
9
10
11
12
13
14
15
16
17
18
19
20
21
22
(define (parse-packet packet) 
 
  ;; Very easy: ID is at position 10 and 11
  ;;            Humidity position 12 and 13
  ;;            Temperature position 14 and 15
 
  ;; These functions get the two bytes into the actual ID,
  ;; humidity and temperature. 
  ;; for the actual formula
  (define id (+ (* (list-ref packet 10) 256) (list-ref packet 11)))
  (define rh (+ (* (list-ref packet 12) 256) (list-ref packet 13)))
  (define temp (+ (* (list-ref packet 14) 256) (list-ref packet 15)))  
 
  ;; We then convert RH and temp according to datasheet for sensirion sht11
  (set! rh (+ (* rh 0.0367) -2.0468 (- (* 0.00000159 rh rh))))
  (set! temp (+ (* temp 0.01) -39.7))
 
  ;; Omissis: print the actual date. See link below for full code.
 
  (printf "~a ~a ~a\n" id rh temp)
  (flush-output)
  )

The final result of this code is the following output

2013/10/29 17:04:55 1 61.36022401 10.379999999999995
2013/10/29 17:05:02 2 35.30190249 23.799999999999997

Where the first number after the time is the node id, followed by the relative humidity, followed by the temperature. I have redirected this output to a file called office-all.txt for one hour, placing one sensor inside my office (with sensor id 2) and one sensor outside the office (sensor id 1). At the end of the hour I split this file with the command-line instruction

grep " 1 " office-all.txt > office-out.txt
grep " 2 " office-all.txt > office-out.txt

Then, I plot the temperature with the following gnuplot script:

set timefmt "%Y/%m/%d %H:%M:%S"
set xdata time
set terminal png font "/Library/Fonts/Arial.ttf" 28 size 1600,1200
set output 'office-temp.png'
plot "office-out.txt" using 1:5 title "Outdoor", "office-in.txt" using 1:5 title "Indoor"

This is the final result:

office-tempNotice how the indoor temperature remains constant (in green), while the outdoor temperature drops in 10 minutes when the sensor adjusts to the outdoor temperature, and it keeps decreasing as the sun sets. A very similar script for relative humidity produces this graph:

office-rh

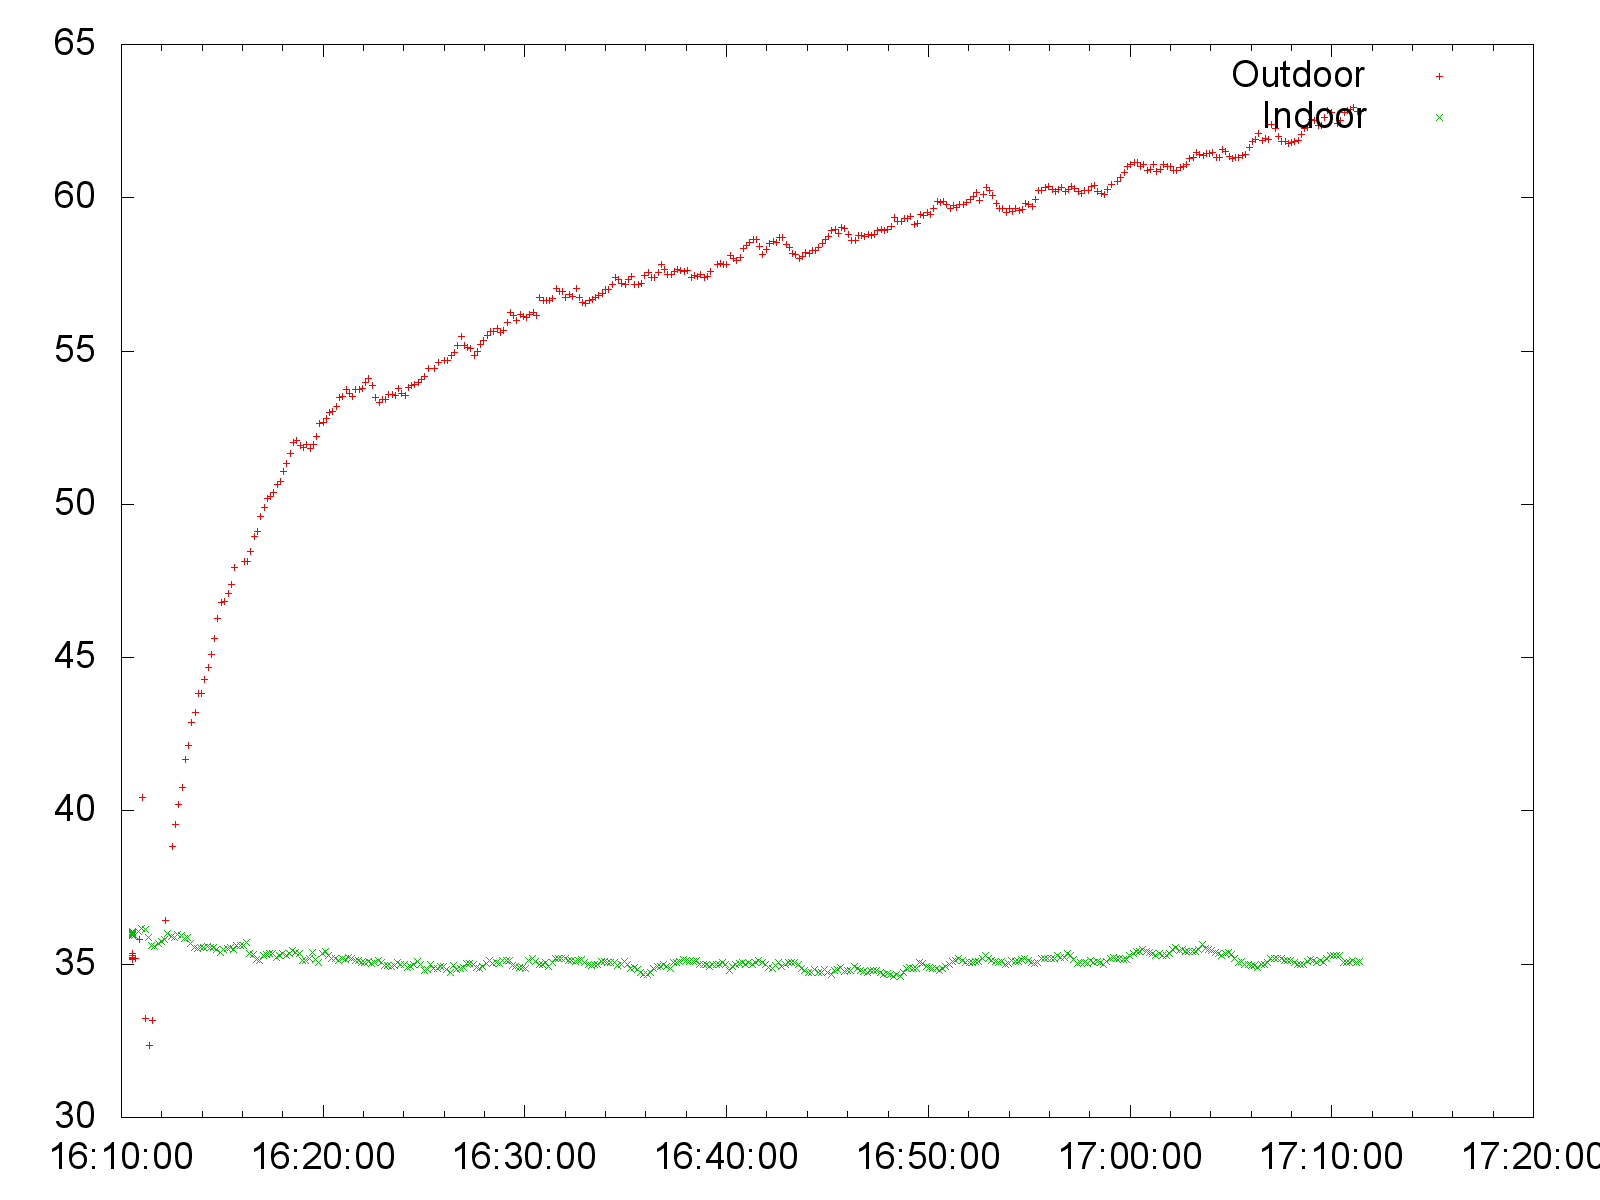
(notice how the relative humidity outside increases as the temperature decreases).

You can download the full Racket code by clicking here.

*** NOTICE!!! *** The parse-packet function is broken: it should take into account the escape sequences before parsing! I leave this to you to fix :-).

A very simple introduction to Fluxus and Fluxa

Screen Shot 2013-10-23 at 13.02.45This is a very simple write-up of my experiments with Fluxus and Fluxa to generate sounds (I don’t call it music…). It is intended for students who know a bit of Racket but have no experience at all with Fluxus and Fluxa. The results are just an example of what can be done, I hope someone will start from these to produce something better.

Back to Fluxus and Fluxa: if you have managed to install it (see my other post on How to Install Fluxus on Mac), make sure that you have Jack running and that you launch fluxa from the command line. Then, launch Fluxus and you can start with the experiments.
First, you need the following line:

(require fluxus-018/fluxa)

Then, you can start playing sounds immediately. For instance, try this:

(play-now (mul (sine 440) (adsr 1 1 1 1)))

The instruction above does the following: it generates a sinusoidal wave of frequency 440 Hz with the instruction (sine 440), and then it multiplies this signal with an adsr envelope with attack, drop, sustain and release all set to 1. If you are like me and don’t have an idea of what an adsr envelope is, please have a look at this simple introduction to synthesizers: http://beausievers.com/synth/synthbasics/

There are different wave forms available in Fluxa: in addition to sine, there is squ (square), tri (triangle) and saw. There are also white and pink noise generators.
It doesn’t stop here: you can use a lot of filters, including various moog filters. Have a look at this page if you are interested: http://www.pawfal.org/fluxus/docs/0.17/en/fluxa.html.

All these ingredients are typically put together in a loop to play music. In fluxa, you use the following construct:

(seq
  (lambda (time clock)
    (when (zmod clock 2)
      (play time (mul (sine (mul 100 (pow (adsr 0 0.1 0.8 1) 6)))
       (adsr 0 0.5 0.4 5))))
  0.5)
)

This is a loop that is repeated every 0.5 second. The lambda function has two parameters: the absolute time (in seconds, since the start of Fluxus) and an integer counter called clock.
The function (zmod clock 2) is true when the value of the clock is a multiple of two, i.e., every other iteration. As each iteration lasts 0.5 seconds, the play instruction is repeated every second; notice that here we use play and not play-now. Play takes and additional time parameter to specify when it should be executed. The magic combination of mutlipliers and adsr envelopes above generates a heart beat (I have copied this from one of the example available in the source code).

You can use fluxa to learn everything you need to know (and a bit more) about modulo functions, synchronization, and reasoning about time. These are some of the examples I have created:

  • Close Encounters of the Third Kind (CETK): just five notes repeated with increasing BPM. You can download cetk.scm here.
  • The SOB beat: instead of using the seq mechanism of fluxa, I use every-frame and plot a graph together with a beat for each SOB, more or less (a SOB is a “Student Observable Behaviour”, a new mechanism of assessment that we use for our undergraduate students of Computer Science; each student is supposed to demonstrate a certain number of SOBs during the year, and we record these using a dedicated tool from which I have exported the observations so far). The graph is equivalent to the one visible from our SOB admin dashboard, with students on the x axis and number of observed SOBs on the y axis. For each student I play a number of beats equal to the number of SOBs. This result in an increasing heartbeat. You can download SOB-beat.scm here and you can also watch a screen capture on Youtube at http://www.youtube.com/watch?v=WWMEfdbk4Kw (you may need to increase your volume)
  • The SOB melody: this is very similar to the previous one, but instead of playing a beat I play a note from a scale. For each student I change the scale in a random way (only 2 scales for the moment). You can download SOB-melody.scm here and you can watch the corresponding screen capture (with some live comments) here: http://youtu.be/1dO1CSgfpBc
  • Finally, back to the seq mechanism and a few operations with modulo: I take the list of SOB id in the order in which they are observed and I play them back in a random scale (selected at the beginning). You can download The delicate sound of sobs here.

Feel free to play around with these files and let me know if you obtain something better!

Installing Fluxus on Mac OS X 10.6-10.8

kleineFluxus is a “a live coding environment for 3D graphics, music and game” available at http://www.pawfal.org/fluxus/. If you know Racket (or LISP, or Scheme) it will look immediately familiar. I wanted to install it for our new Computer Science degree, where we teach Racket, and I wanted to do some experiments with its music capabilties. However, the installation is not exactly user-friendly… I have tried the precompiled package available from the website but sound did not work for me (flexa was missing). In the end, I installed the source files and compiled them, and I managed to have the sound.

This is what I have done on a Mac OS X 10.6 (a 6 year-old Mac Pro) and Mac OS X 10.8 (a 3-week old Mac Book Pro). It is essentially what the README file in the source tree tells you to do; the problem is that you find a lot of websites giving you different suggestions, including the README file itself. For instance, the README file tells you that you can use Homebrew to install fluxus, but the homebrew installation is broken for the moment… So, here it goes:

  • Install the 32 bit version of Racket, dowloadable from http://racket-lang.org/download/. I have installed 5.3.6. Notice that you really need the 32 version: fluxus will not link against the 64-bit version.
  • Install Macports from https://www.macports.org/install.php. This is needed to install all the fluxus dependencies below.
  • Clone the fluxus source code: git clone git://git.savannah.nongnu.org/fluxus.git
  • Add the following two lines to your .bash_profile:
    PATH=$PATH:/opt/local/bin:/Applications/Racket\ v5.3.6/bin/
    export DYLD_FRAMEWORK_PATH=/Applications/Racket\ v5.3.6/lib/

    Make sure that the Racket version is correct, and change it appropriately if needed.The file .bash_profile shoud be in your home directory, typically something like /Users/franco/. If it does not exist, just create it and make sure to open a new terminal so that these variables are loaded. You can check this with the command echo $PATH from the command line.

  • Install all the dependencies using macport. From the command line, run:
    sudo port install fftw-3 +universal glew +universal freetype \
      +universal jpeg +universal liblo +universal libpng +universal \
      libsndfile +universal ode +universal tiff +universal zlib \ 
      +universal scons

    (all this should be on a single line. If not, remember to add the backslash at the end). This will take a bit of time, don’t worry and have a coffee or tea in the meanwhile.

  • Install JackOSX from http://www.jackosx.com/. I have installed version 0.90 beta 15. This requires to reboot your computer, do this now and have another coffee or tea in the meanwhile.
  • Go back to the directory where you have downloaded fluxus. In this directory, type:
    scons ADDONS=0

    to compile fluxus. Again, you will need to wait a bit (but not too much, not enough for another coffee or tea). Scons is yet another building system that was installed using macports a few lines above.

  • Finally, you can install fluxus with:
    sudo scons ADDONS=0 install

You are now ready to test the sytem. You need to start Jack and fluxa, and then you’ll be able to play some music. More in detail:

  • In Applications, look for the folder called Jack, open it and double click on JackPilot. Check that the configuration is correct, save it, and then start JackPilot. Wait a few seconds and it should be ready, giving you CPU load.
  • In a terminal, launch the command fluxa (it should be in your path). It should just say “fluxa server ready”
  • Finally, let’s try to play something. In a terminal, go to the source tree of Fluxus, enter the “examples” directory, and at the command line type fluxus sound.scm. Press ctrl+e (or F5) and enjoy…

New academic year: welcome!

parliamenthill2

It is Sunday evening, and for a lot of students tomorrow will be the first day at Middlesex University. Formal lectures will only start on the 7th of October, but from tomorrow “induction week” is on and students will get their access cards and will go through a lot of activities, meeting staff members and other students.

This year I teach “Information Security Management” for MSc students in Electronic Security and Digital Forensics. I will talk about this in another post at some point in the future.

More importantly, tomorrow will be the first day for our new undergraduate Computer Science programme. This is a completely new programme: in their first year, students will use Racket, Arduino boards, Rasperry Pi, and a will do a lot of interesting things, including reading and posting tweets from a robot…

I still remember my first academic year and I can also remember my very first days at university. Given that the first days are so important (see the Baby duck syndrome for an interesting article on imprinting and software), we have decided to make this first week a bit different… We will work with students to learn the basic ingredients of LaTeX, “the de facto standard for the communication and publication of scientific documents”. LaTeX is a simple example of a programming language, and this is a simple example of LaTeX program:

1
2
3
4
5
6
7
8
9
10
11
12
13
14
15
16
17
18
19
20
21
22
23
24
25
\documentclass{article}
 
\begin{document}
 
\title{Hello World!}
\author{Franco Raimondi}
 
\maketitle
 
\section{Introduction}
Printing Hello World is usually the first thing you learn in a programming language.
 
\section{Another section}
 
You probably know this equation:
\begin{equation}
E=mc^2
\end{equation}
 
This is another very important equation:
\begin{equation}
i \hbar \frac{\partial}{\partial t} \Psi = \hat{H} \Psi
\end{equation}
 
\end{document}

With LaTeX you do not worry about the actual output, but you simply say that “Hello World” (line 5) is a title, that the Author is Franco Raimondi (line 6), that there is a section whose title is Introduction (line 10), and that the content of the section is “Printing Hello World is usually the first thing you learn in a programming language.” (see http://en.wikipedia.org/wiki/Hello_world_program if you want to know more). At line 13 another section begins, containing two equations (the syntax of equations in LaTeX will not be covered, but you can find plenty of documentation on-line).

In the labs, students will compile LaTeX code and generate PDF files using one of the many compilers available such as MiKTeX and TeXnicCenter, learning that the compiler takes care of the actual result.

Click on this link to see the final result for the example above.

Finally, if you have Facebook or Twitter, don’t forget to follow these two pages: