Category Archives: research

Asip now available through Arduino Library Manager

As you probably know if you have read this blog before, Asip is a protocol to control an Arduino board from a computer. The protocol is intended to be a more extensible replacement for Firmata. The idea is that you can control the board directly from a USB or network connection by means of simple plain text messages, such as I,p,13,1 to set pin 13 to high.

From today, installing Asip on an Arduino board is much simpler:

  • Make sure that the version of your Arduino IDE is at least 1.6.2 and open it.
  • Click on Sketch -> Include Libraries -> Manage Libraries to open the library manager.
  • Type asip in the search box and you should get something similar to the following imageArduino library manager for Asip
  • Click on the first link for simple I/O services (you can add support for additional services later with the second link).
  • Click on File -> Examples -> asip and open AsipIO.
  • Connect your board, upload the sketch and you are ready to go.

If you want to use servo motors, sonar distance sensors and piezo tones, in addition to the plain asip library install also the library asip-additional-services and check the examples.

We have developed client libraries in Racket, Java and Python. Contact me if you need additional details, we will try to add tutorials and further documentation as soon as we have time.

Controlling an Arduino board via USB with the ASIP protocol

mirtoLast year we built the Middlesex Robotic Platform (MIRTO) using a Raspberry Pi and an Arduino Uno board. In our configuration the Arduino board is essentially a “slave” of the Raspberry Pi. A pair of HUB-ee wheel, infra-red sensors and bumper sensors are attached to the Arduino board, but all the “logic” is on the Raspberry Pi. It is the Raspberry Pi that sends the instructions to read the IR values and to set the speed of the wheels. In our configuration, the Arduino board is attached to the Raspberry Pi using a serial connection (GPIO pins on the Raspberry Pi and pin 0 and 1 on the Arduino). In MIRTO we installed Firmata on the Arduino board and we extended Firmata clients available on the Raspberry Pi. More precisely, we had to extend Firmata with specific messages for wheels (both directions: to set the speed and to read quadrature encoders) and for all the other extensions we wanted to use, such as sonar distance sensors. I think that protocols of this kind can open a lot of opportunities, by allowing the integration of platforms such as Raspberry Pi and possible multiple Arduino boards.

However, we soon realised that Firmata is not as easy to extend as we wanted, in particular it may be difficult to add one of the many available Arduino libraries for things such as NeoPixels etc.. We also found the 7-bit message encoding of Firmata messages error prone (in the sense that our code had a lot of bugs :-). For these reasons, Michael Margolis suggested the implementation of a new, simpler protocol. We wanted the protocol to be text-based and to allow easy integration of new services. We have now a working implementation of this protocol that we called the Arduino Service Interface Protocol (ASIP). Michael has developed the Arduino code, which is available at this link:

We have then written client libraries for:

(and we are working at a Python implementation).

The current implementation uses serial communication, but Michael Margolis has designed the protocol so that it can be very easily adapted to any form of streaming communication.

OK, let’s see some practical details. First of all, a quick overview of the installation process:

  1. Download the code available at https://github.com/michaelmargolis/asip; you will see that there are two directories: documents/ and asip/
  2. Copy the directory asip/ (not documents) to the library folder of your Arduino IDE. If you don’t know where this folder is, check Manual Installation at this link http://arduino.cc/en/Guide/Libraries
  3. Restart your Arduino IDE. At this point, if you click File -> Examples, you should see an asip menu. Select AsipIO to install a simple ASIP Input/Output configuration. This will allow you control digital and analog pins.
  4. Connect an Arduino board, upload the code, open the serial monitor and check that you are receiving regular message of the form
    @I,A,{...}

    (these are the analog values of analog pins).

If everything is OK on the Arduino side, you can now play with one of the libraries available. As an example, I’m going to show you how to use the Java library available at https://github.com/fraimondi/java-asip. Clone the repository and open one of the examples, for instance src/uk/ac/mdx/cs/asip/examples/SimpleBlink.java. The code is the following:

package uk.ac.mdx.cs.asip.examples;
 
import uk.ac.mdx.cs.asip.AsipClient;
import uk.ac.mdx.cs.asip.SimpleSerialBoard;
 
/* 
 * @author Franco Raimondi
 * 
 * A simple board with just the I/O services.
 * The main method does a standard blink test.
 * We extend SimpleSerialBoard but this is not
 * strictly required for this example.
 */
public class SimpleBlink extends SimpleSerialBoard {
 
	public SimpleBlink(String port) {
		super(port);
	}
 
	public static void main(String[] args) {
 
                // You need to provide the serial port to which Arduino
                // is connected. Under Win this could be COM3 or COM4,
                // check the Arduino IDE to find out.
		SimpleBlink testBoard = new SimpleBlink("/dev/tty.usbmodem1411");
 
                // We need a try/catch block to sleep the thread.
		try {
                        // This is a simple setu-up: we request
                        // port mapping for digital ports (not strictly
                        // necessary).
			Thread.sleep(1000);
			testBoard.requestPortMapping();
			Thread.sleep(500);
                        // We then set pin 13 to OUTPUT mode and pin 2 
                        // to input (pull-up) mode, even if pin 2 will
                        // not be used and therefore we could skip this.
			testBoard.setPinMode(13, AsipClient.OUTPUT);
			Thread.sleep(500);
			testBoard.setPinMode(2, AsipClient.INPUT_PULLUP);
			Thread.sleep(500);
		} catch (InterruptedException e) {
			e.printStackTrace();
		}
		while(true) {
                        // As above, we need a try/catch block to sleep.
                        // Then, we just loop forever, turning on and off
                        // a LED attached to pin 13.
			try {
				testBoard.digitalWrite(13, AsipClient.HIGH);
				Thread.sleep(2000);
				testBoard.digitalWrite(13, AsipClient.LOW);
				Thread.sleep(500);
			} catch (InterruptedException e) {
				e.printStackTrace();
			}
		}
	}
}

The code should be pretty self-explanatory. It subclasses a class called SimpleSerialBoard (but this is not strictly necessary), then sets up the pin modes and loops forever writing HIGH and LOW to pin 13. You can explore other methods by opening the files LightSwitch.java and Potentiometer.java, showing how to read digital and analog input pins.

Before discussing how to add additional services, let’s have a look at the format of ASIP messages. Messages are ASCII messages, terminated by an end-of-line character. An example message to the Arduino board is I,P,13,1 where I is a character identifying a service (in this case, the Input/Output service), followed by an instruction to that service (in this case, P, meaning setting the value of a digital pin), followed by the pin number and by the number to be written.

Messages from the Arduino board are initiated by a special character: @ starts a standard message, ~ starts an error message, and ! starts debug/reporting messages. After this character, the message has a structure similar to the one above: a service ID, followed by a service-specific character, and then a list of parameters.

The Java library simply abstracts from these messages and provides easy to remember method names. The library creates a reading thread to manage incoming messages. This structure is the same in the Racket and Erlang clients. The key notion of ASIP is the one of a service. Example of services are a distance service, a motor service, a NeoPixel LED strip service, etc. Each service is identified by a single-character ID. For instance, a motor service has ID ‘M’, while a distance sensor has ID ‘D’, etc. If you want to implement a new service, you need to do two things:

  1. Implement code for the Arduino board.
  2. Implement code for a client library.

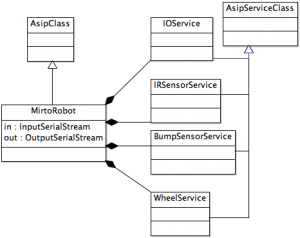
As an example of how to implement a new service, switch to branch neopixels on https://github.com/michaelmargolis/asip/ and open the file asip/utility/asipNeoPixels.h. This is the header file to define a new service to control a strip of NeoPixels LEDs. As you can see from the header file, we are defining a new class asipNeoPixelsClass that is a subclass of asipServiceClass. The new class needs to implement some abstract method of the superclass. In particular, it should define how to process messages directed to this class. Open the implementation asipNeoPixelsClass.cpp and check the method processRequestMsg: it shows how to process messages to set brightness, change the colour of a pixel, and show the LED strip. You decide what to implement here, and how. So far, we have IDs for specific operations that we want the service to perform, followed by optional parameters, all in the form of comma-separated values.

After defining this new service class, you should write Arduino code to instantiate this new service. For an example, open the file examples/AsipNeoPixels/AsipNeoPixels.ino. This file creates a firmware with support for standard I/O service, for a distance service attached to pin 4, and for two NeoPixels strips attached to pins 6 and 9. Essentially, this code creates the appropriate services, adds them to array of services to be added to the main loop, sets up the pins appropriately, and then loops by invoking the method service of AsipClass. This is the method that keeps reading incoming messages and dispatches them to the registered services, and also sends data from services to the serial port.

Upload the code above to the board and at this point the board should be ready to use: just send messages to the serial port with the appropriate ID and requests, and you will see pixels turning on and off. You can do this from the serial monitor, if you just want to test things. If you want to define a corresponding Java service for java-asip, have a look at the file src/uk/ac/mdx/cs/asip/services/NeoPixelService.java at https://github.com/fraimondi/java-asip/. This class extends a generic AsipService class and provides methods to read/write messages for NeoPixels services. As an example of application, check the file src/uk/ac/mdx/cs/asip/examples/SimpleNeoPixelWithDistance.java: the file shows how to initialise a board with all the required services and how to use the methods provided by NeoPixelService.java.

We have published a tool paper about ASIP, you can find it here:

As usual, drop me an email of leave a comment if you have questions..

Calling Java from C++ on Mac OSX Mavericks with JNI and Java 8.

For a small research project I need to invoke Java from C++. More precisely, in the C++ code I need to create an object by calling a constructor and then invoke some methods. Surprisingly, I was not able to find a lot of information on-line. There are a number of tutorials to call C/C++ from Java, but not much for the other direction and very little for Java 8 on Mac. This is a very quick summary of what I’ve done, taken mainly from http://www.ibm.com/developerworks/java/tutorials/j-jni/j-jni.html and modified appropriately. Let’s start from a simple Java class, something like this:

package com.example.simple;
 
import java.util.List;
import java.util.ArrayList;
 
public class SimpleJNITest {
  List values;
 
  public SimpleJNITest() {
    values = new ArrayList();
  }
 
  public void addValue(String v) {
    values.add(v);
  }
 
  public int getSize() {
    return values.size();
  }
 
  public void printValues() {
    for (String v: values) {
      System.out.println("Value: " + v);
    }
}

This is nothing special: a simple Java class with a constructors and a few methods to add values to a list, get the list size, and print the values of the list to standard output. Save this file to SimpleJNITest.java in the directory com/example/simple (I assume you are working at the root of this directory). Now, let’s suppose you need to do the following from a C++ file:

  • Create a new object of type SimpleJNITest.
  • Add some values to this object.
  • Retrieve the number of values currently stored.
  • Invoke the printValues method to print values to screen.

The solution is the following (comments in the code. Make sure you read all the comments carefully before asking questions!).

/* Remember to include this */
#include <jni.h>
#include <cstring>
 
/* This is a simple main file to show how to call Java from C++ */
 
int main()
{
  /* The following is a list of objects provided by JNI.
     The names should be self-explanatory...
   */
  JavaVMOption options[1]; // A list of options to build a JVM from C++
  JNIEnv *env;
  JavaVM *jvm;
  JavaVMInitArgs vm_args; // Arguments for the JVM (see below)
 
  // This will be used to reference the Java class SimpleJNITest
  jclass cls;
 
  // This will be used to reference the constructor of the class
  jmethodID constructor;
 
  // This will be used to reference the object created by calling
  // the constructor of the class above:
  jobject simpleJNITestInstance;
 
  // You may need to change this. This is relative to the location
  // of the C++ executable
  options[0].optionString = "-Djava.class.path=.:./";
 
  // Setting the arguments to create a JVM...
  memset(&vm_args, 0, sizeof(vm_args));
  vm_args.version = JNI_VERSION_1_6;
  vm_args.nOptions = 1;
  vm_args.options = options;
 
 
  long status = JNI_CreateJavaVM(&jvm, (void**)&env, &vm_args);
 
  if (status != JNI_ERR) {
    // If there was no error, let's create a reference to the class.
    // Make sure that this is in the class path specified above in the
    // options array
    cls = env->FindClass("com/example/simple/SimpleJNITest");
 
    if(cls !=0) {
      printf("Class found \n");
      // As above, if there was no error...
 
      /* Let's build a reference to the constructor.
	 This is done using the GetMethodID of env.
	 This method takes 
	 (1) a reference to the class (cls)
	 (2) the name of the method. For a constructor, this is 
             <init>; for standard methods this would be the actual
             name of the method (see below).
	 (3) the signature of the method (its internal representation, to be precise). 
	     To get the signature the quickest way is to use javap. Just type:
             javap -s -p com/example/simple/SimpleJNITest.class
             And you will get the signatures of all the methods,
             including the constructor (check the "descriptor" field).
             In the case of the constructor, the signature is "()V", which
             means that the constructor does not take arguments and has no
             return value. See below for other examples.        
       */
      constructor = env->GetMethodID(cls, "<init>", "()V");
 
      if(constructor !=0 ) {
 
	printf("Constructor found \n");
	/* If there was no error, let's create an instance of the SimpleTestJNI by
	   calling its constructor
	*/
	jobject simpleJNITestInstance = env->NewObject(cls, constructor);
 
	if ( simpleJNITestInstance != 0 ) {
	  /* If there was no error, let's call some methods of the 
	     newly created instance
	  */
 
	  printf("Instance created \n");
 
	  // First of all, we create two Strings to be passed
	  // as argument to the addValue method.
	  jstring jstr1 = env->NewStringUTF("First string");
	  jstring jstr2 = env->NewStringUTF("Second string");
 
	  /* Then, we create a reference to the addValue method.
	     This is very similar to the reference to the constructor above.
	     As above, you can get the signature of the addValue method with javap.
	     In this case, the method takes a String as input and does not return
	     a value (V is for void)
	   */
 
	  jmethodID addValue = env->GetMethodID(cls, "addValue", "(Ljava/lang/String;)V");
 
	  /* Finally, let's call the method twice, with two different arguments.
	     (it would probably be a good idea to check for errors here... This is
	      left as a simple exercise to the student ;-).
	   */
	  env->CallObjectMethod(simpleJNITestInstance , addValue, jstr1);
	  env->CallObjectMethod(simpleJNITestInstance , addValue, jstr1);
 
	  /* Let's now call another Java method: printValues should print on screen
	     the content of the List of values in the object. The pattern is identical
	     to the one above, but no arguments are passed.
	  */
	  jmethodID printValues = env->GetMethodID(cls, "printValues", "()V");
	  env->CallObjectMethod(simpleJNITestInstance , printValues);
 
	  /* Finally, let's extract an int value from a method call. We need to
	     invoke CallIntMethod and we are going to use getSize of 
	     simpleJNITestInstance. Notice the signature: the 
	     method returns an int and it does not take arguments
	  */
	  jint listSize;
	  jmethodID getSize = env->GetMethodID(cls, "getSize", "()I");
	  listSize = env->CallIntMethod(simpleJNITestInstance , getSize);
 
	  printf("The size of the Java list is: %d\n", listSize);
 
        }
      }
      else {
	printf("I could not create constructor\n");
      }
    }
    jvm->DestroyJavaVM();
    printf("All done, bye bye!\n");
    return 0;
  }
  else
    return -1;
}

The code in itself is not too difficult. The main problem is getting the correct location of the various header files and libraries… To make the whole thing run, save the code above in a file (call it test.cpp) and do the following:

  • Compile the Java class: this is easy, just type
    javac com/example/simple/SimpleJNITest.java
  • Compile the C++ file: this is slightly more complicated because you need to specify various paths. The command on my machine (Mac OSX Mavericks, Java 1.8, gcc) is the following:
    g++  -o test \
     -I/Library/Java/JavaVirtualMachines/jdk1.8.0.jdk/Contents/Home/include \
     -I/Library/Java/JavaVirtualMachines/jdk1.8.0.jdk/Contents/Home/include/darwin \
     -L/Library/Java/JavaVirtualMachines/jdk1.8.0.jdk/Contents/Home/jre/lib/server/ \
     test.cpp \
     -ljvm
    

    You can remove the backslash at the end of each line if you write the command on a single line. The two -I directives tell where to find jni.h and jni_md.h; the -L (and -l) directive are used by the linker to find libjvm.dylib. If the compilation is successful, you should get an executable called test.

  • Before running test, you need to set LD_LIBRARY_PATH with the following instruction:
    export LD_LIBRARY_PATH=/Library/Java/JavaVirtualMachines/jdk1.8.0.jdk/Contents/Home/jre/lib/server/
  • From the same terminal where you have executed the command above, just type ./test.

Et voila, job done, if everything is OK you should see something like this:

$ ./test 
Class found 
Constructor found 
Instance created 
Value: First string
Value: First string
The size of the Java list is: 2
All done, bye bye!

Book Review: The Golden Ticket

The Golden Ticket: P, NP, and the search for the impossible
by Lance Fortnow

I had this book on my bedside table for the past two months. As you can see, I did not have time to write anything here since the end of April: the end of term, exam marking, exam boards, a long list of project deadlines and reviews for various conferences meant that I had to postpone almost everything that was not urgent, including the removal of items from the stack on my bedside tabale (the actual structure of the pile of items is an interesting topic of research on its own: see exercise below).

An eleven hours flight to San Francisco is the perfect environment to read this short book, to write this post, and to make my wife slightly less upset about the status of my bedside table: hopefully I’ll be able to empty it by the end of summer so that dust can be appropriately removed without the need of finding the shortest path among all the obstacles I leave on it.

Back to the book: it starts with the observation that “there seems to be no limits to what computers can do. Or is there? [The] book explores the computational problems that we may never be able to compute easily“.

The bold is mine, because this is the key issue: some problems have solutions that are “easy” to compute, some others are difficult.  The book is not about undecidable problems (see my other post www.rmnd.net/the-universal-computer/ for a reference), but about the complexity of problems for which a solution exists. The book avoids all the technical details of complexity classes expressed in terms of Turing machines and focuses instead on two of them: the class of “easy” problems called P (because they can be solved with an algorithm that runs in time polynomial in the size of the input), and the class of problems for which a solution cannot be computed easily but, when a solution is given, its correctness can be verified easily. This latter class is called Non-deterministic Polynomial, because when a solution can be guessed, it can be verified in polynomial time. If you are interested in the mathematical details, I recommend the book “Computational Complexity” by Christos Papadimitriou.

One of the fundamental questions in Computer Science and in Mathematics is: are the two classes P and NP equal or different? This is the question that the book explores with captivating examples and a presentation that is suitable for everyone.

Chapter 3 provides examples of problems in P (matching problems, shortest and Eulerian paths, min-cut) and so-called NP-complete problems (Hamiltonian cycles, four colour problem, max-cut). I know my list may sound boring, but the presentation in the book is full of clear and funny examples. Additional hard problems are described in Chapter 4, including games such as Minesweeper, Tetris and Sudoku, the satisfiability problem and the works of Cook, Karp and Knuth.

Chapter 6 presents in a very clear way some of the techniques that can be used to solve “difficult” problems in NP, and Chapter 7 describes some of the techniques that have been employed to tackle the P vs. NP problem. This latter chapter, together with Chapter 5, are my favourite in the book: they provide the historical context in which the problem was born, and they give an account of both the Western and the Eastern research groups involved. This is something you don’t find in standard textbook and is one of the reasons you should read this book even if you already familiar with computational complexity (in addition to a very useful list of examples that can be used for teaching purposes)

Chapters 8 to 10 take a detour in cryptography and quantum computing, presenting the important connections between these topics and complexity theory, and concluding with a list of challenges for the future that go beyond the P=NP question.

Franco, did you buy a faulty book without chapter 2? Why are you not talking about it?
Because I think it should have been more formal. The chapter talks about an ideal world in which P is equal to NP: in this world it would be possible to cure cancer and to forecast weather at any time in the future. I don’t think this is the case. I am not an expert in DNA sequencing, but I know something about weather forecast: in this case reliability is not related to the complexity of finding a solution, but to the problem of the dependance from initial conditions (the famous butterfly effect). Even if we had a polynomial algorithm for weather forecast, I think this would not solve the issue of the uncertainty of result given the sensitivity on initial conditions.

So should I read the book or not?
You should definitely read it! The book is excellent, a pleasure to read and full of very interesting and useful information. I personally did not like the style of chapter 2, but this is the only issue I had (and it could be that other people like that chapter); I really enjoyed everything else.

The Golden Ticket
P, NP, and the search for the impossible
by Lance Fortnow
Princeton University Press, 2013

Continue reading

Repast Simphony (Java): a quick overview + installation instructions

I started playing with Repast Simphony both for research and for teaching. This is a first post that includes  a quick overview (part I) and some installation instructions (part II). Hopefully I will be able to add more details  in the future.

Part I: Quick overview

Repast Simphony 2.0 is an “agent-based modeling and simulation platform”. Using this platform agents can be modelled using ReLogo (a dialect of Logo), flowcharts, Groovy, or Java.  Notice that there is also a Repast for High Performance Computing “intended for large-scale distributed computing platforms” using C++. Here I am only looking at Repast Simphony, and only at Java as a modelling language.

The tutorial available at http://repast.sourceforge.net/docs/RepastJavaGettingStarted.pdf provides a step-by-step guide for building a simple application called jzombie. I’m not going to go through this tutorial in detail. Instead, I highlight some of the key features of this framework using the example from the tutorial.

In Repast agents are created as simple Java classes with the use of some Repast-specific methods. For instance, this is an excerpt of the Human class in jzombie:

1
2
3
4
5
6
7
8
9
10
11
12
public class Human {
  private Grid<Object> grid;
  // [...]	
 
  @Watch(watcheeClassName = "francojrepast.Zombie",
	watcheeFieldNames = "moved",
	query = "within_moore 1",
	whenToTrigger = WatcherTriggerSchedule.IMMEDIATE)
  public void run() {
          // [...]
  }
}

Human agents live in a Grid (a Repast Class), and the simulator invokes the method run() whenever the condition specified in the @Watch annotation becomes true (intuitively: whenever a Zombie is at distance 1). Zombie agents are modelled in a very similar way and they implement a method step() that is invoked at every step in the simulation (see the tutorial for the full code). All the agents are defined in a context, as exemplified by the following code:

1
2
3
4
5
6
7
8
9
10
11
12
13
14
15
16
17
18
19
20
public class JZombiesBuilder implements ContextBuilder<Object> {
 
  @Override
  public Context build(Context<Object> context) {
  // [...]
    int xSize = (Integer)params.getValue("x_size");
    int ySize = (Integer)params.getValue("y_size");
    int zombieCount = (Integer)params.getValue("zombie_count");
    int humanCount = (Integer)params.getValue("human_count");
    // [...]
    for (int i = 0; i < zombieCount; i++) {
      context.add(new Zombie(space, grid));
    }
    for (int i = 0; i < humanCount; i++) {
      int energy = RandomHelper.nextIntFromTo(400, 1000);
      context.add(new Human(space, grid, energy));
    }
    // [...]
  }
}

The method build() reads parameters from the simulator (see below) and creates the appropriate number of agents (notice the use of the Repast class RandomHelper to generate random values for energy levels of humans). Agents are added to the context that, in turn, is created by the simulator. The Repast simulator is invoked from Eclipse (see tutorial for the details), and this is what it looks like after it starts:

Screen shot 2013-04-17 at 17.03.29Notice that these are the same parameters specified in the context Builder above. The simulator can be configured to display the grid and, by running it, it is possible to follow the evolution of the system. This what the grid looks like at the beginning of the simulation:

Screen shot 2013-04-16 at 17.20.43

It is possible to add a number of features to the simulator. For instance, it is possible to create data collections (such as counting the number of agents) and to display time series. This is an example of the total number of Humans and total number of Zombies over time:

Screen shot 2013-04-16 at 17.21.33

It is also possible to define connectors with external tools, such as R, Excel, and generate SQL code. This is what I am planning to do next.

Part II: Installation Instructions

First of all you need to download the tool, which essentially runs as an Eclipse plug-in. Depending on your platform, this is what you need to do:

  • Mac OS X: just download the 64-bit image or the 32-bit image and follow the very easy instructions. This will download a (large) image containing Eclipse 3.7 and all the necessary plug-ins already installed.
  • Windows: download and run the Windows Installer (I have not tried this, but I assume that it is similar to Mac OS X)
  • Linux: this is slightly more complicated:
    • You need to download Eclipse. I used a fresh copy of Eclipse 3.7 Classic 64 bit (a 32 bit version is also available).
    • You then need to install Eclipse XML Editors and Tools: click on Help -> Install New Software, then click in “Work with” and select “All Available Sites”. Scroll down the list, expand “Programming Languages” and select “XML Editors and Tools”. Complete the installation and restart Eclipse as required.
    • You then need to install Groovy using a local archive. Download this zip archive and expand it somewhere on your disk. Go back to “Help -> Install New Software”, now click Add, select Local, and browse to the directory you have just created. Select all items and install them. Again, Eclipse will restart.
    • At this point you can install Repast Simphony. Once more, click on “Help -> Install New Software”, select Add and in Location copy this link: http://mirror.anl.gov/pub/repastsimphony. Select everything, install and restart Eclipse.

If everything went well, you can now start the platform. If you are using Mac, you will find Repast in your Applications folder. If you are running Linux, just start Eclipse. You can create a new Java Repast project with File -> New -> Other, open Repast Simphony and choose “Repast Simphony Project”. At this point you can go back to the tutorial.


Book review: The Universal Computer

I saw this title on a tweet by an Italian friend a couple of months ago, and I decided to add it to my queue of books-to-read, thanks to various positive reviews that are available online:

Martin Davis, The Universal Computer: The road from Leibniz to Turing.
Published by W. W. Norton & Co., 2000. 270 pages

I have now finished it and I can  say that this is not a good book: this is an extraordinary book about the history of computer science, and it should be compulsory reading in any CS curriculum.

The book provides an overview of a number of key figures in the history of mathematics and computer science: Leibniz, Boole, Frege, Cantor, Hilbert, Godel and Turing, with two final chapters on “hardware” history and directions for the future. What makes the book unique is that the presentation of the various philosophers and mathematicians is as captivating as the best novel you have ever read: it is just not possible to stop reading it. In fact, I am currently late with a couple of reviews that I planned to complete on a Eurostar trip because I had to finish this book.

The presentation is self-contained, no background knowledge is required to understand the various chapters (neither of philosophy nor of mathematics  / computer science). The description of the proofs of incompleteness for PA and undecidability for FOL are probably the most accessible I have ever seen (don’t forget to have a look at all the notes at the end of the book: they are as clear and as important as the main body of the book).

It is true that the book does not give an in-depth analysis of the various philosophers. It is true that some figures are missing (e.g., no mention of Tarski in “Beyond Leibniz’s Dream”). It is also true that the approach is a bit Manichean in some points (and in some cases my personal opinions are probably on the “wrong” side). Nevertheless, I think this book is fundamental to understand our position in history, what we do, and why we do it.

Overall, I think this book should be at the top of your reading list, right next to ZAMM.

SCOPUS: check your profile

Yesterday we played “let’s see who has the bigger h-index” with a couple of colleagues. We decided to use Scopus (well, the free version of it) because it gives more conservative results wrt to Google Scholar. Also,  Scopus may be used for assessing the quality of research, and I can easily imagine a reviewer looking for my profile if I submit a proposal or a paper.

I was a bit surprised to discover that I do not appear in Scopus:

There is a Raimondi Francesco Maria with publications in Medicine, Engineering, Computer Science, and additional areas that I cannot see because I do not have a Scopus account.

This is strange: I’m sure some of my publications should appear here (some of them are with Elsevier!), I have a Google Scholar Profile and it is more or less accurate.

I decided to contact the helpdesk using the “Live Chat” option. This was quite useful as I discovered a website to “fix” these issues: http://www.scopusfeedback.com/

 The process is quite boring, but at least I could find my papers: they are listed under Raimondi Francesco Maria. I had to scroll the whole list of publications and manually select those that are mine. I have done this yesterday afternoon, I am not listed as a separate author yet, but hopefully someone is on the case…

So, to sum up: check your profile on Scopus.